
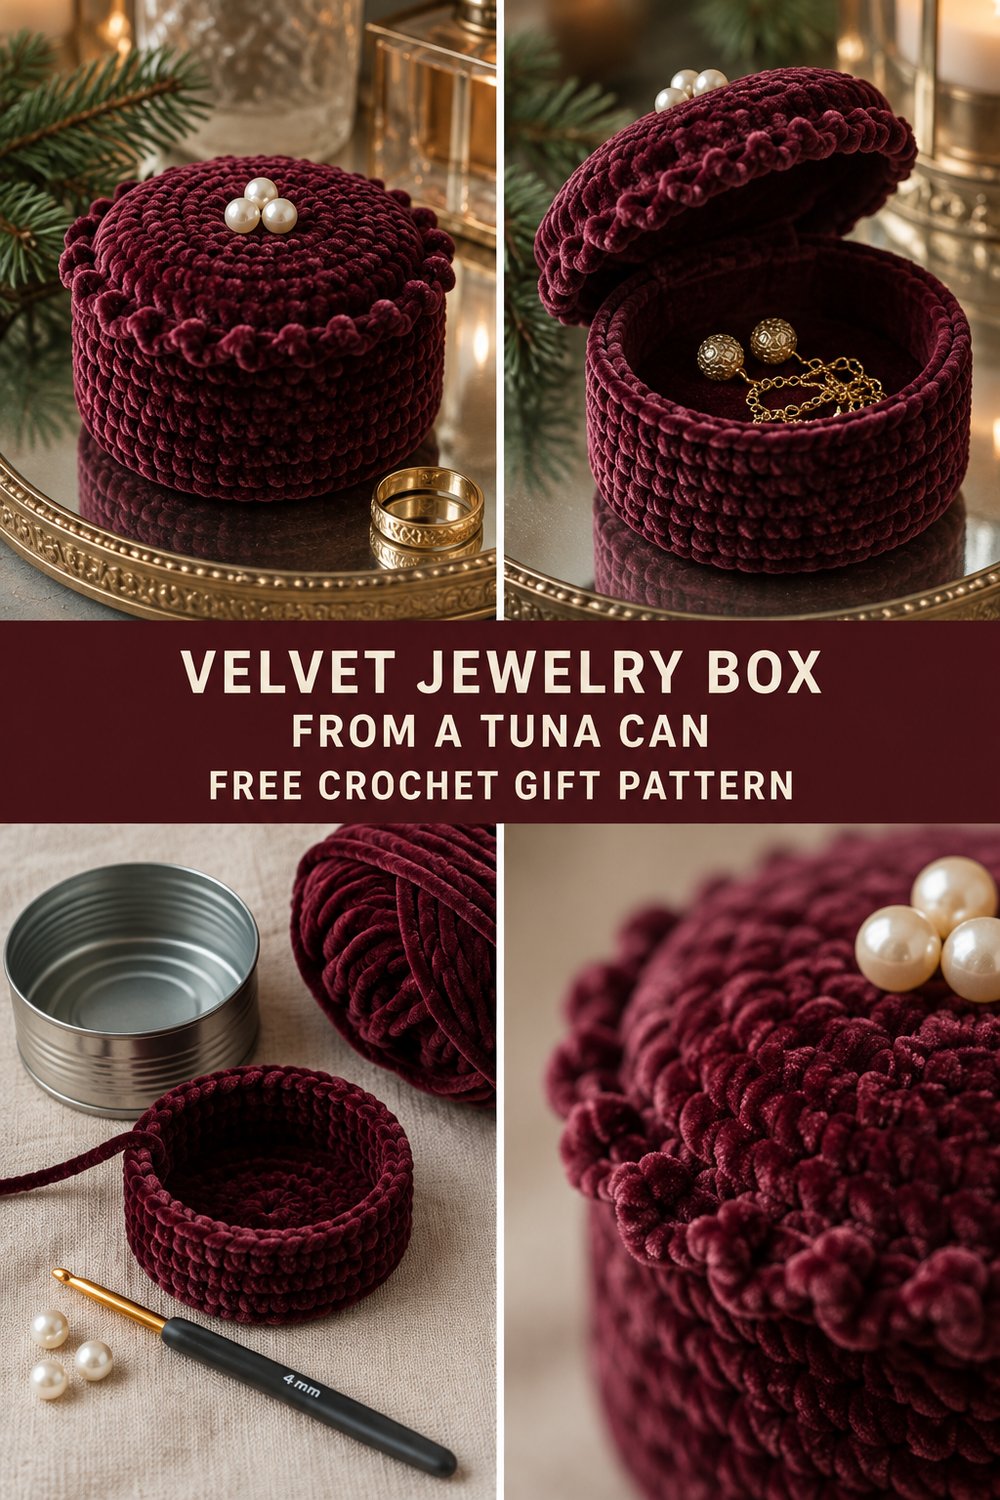
Save the can, keep the sparkle. Transforming a washed kitchen staple into a boutique-worthy keepsake is one of those holiday magic tricks that never fails to delight, especially when wrapped in plush, light-catching plush yarn. This handmade velvet trinket box feels remarkably weighty and luxurious on a vanity tray, keeping precious rings and studs safe beneath a softly domed, pearl-topped lid.
Crochet Christmas Gift Idea — Velvet Tuna Can Jewelry Box
Quick Facts
- Stitches Used: ch, sc, hdc, dc, sl st, picot
- Size Fit: One standard 5 oz (142g) tuna can (approx. 3.25″ / 8.25 cm diameter)
- Estimated Hours to Complete: 2 to 3 hours
- Gift-Appeal Framing: An ingenious, budget-friendly upcycled crochet gift that looks like an expensive boutique find under the tree, perfect for fast holiday crafting and craft fairs.
Sizing customization tips for altering this pattern to fit different tin sizes are included further down.
What Makes This Velvet Tuna Can Jewelry Box Special
This pattern marries structural stability with ultra-plush texture. By crocheting tightly around a clean, recycled metal tuna can, the project gains an instant rigid armature that eliminates the need for plastic canvas or cardboard inserts. The exterior is worked entirely in dense single crochet using a plush polyester velvet yarn, which hides any hint of the metal underneath while creating a rich, light-catching sheen. The domed lid uses a series of gentle decreases and is crowned with a delicate picot edge and three hand-stitched pearl beads, giving it a polished heirloom finish.
Skill Level
Easy — Ideal for adventurous beginners who are comfortable working in the round and managing textured yarn.
- Required Skills:
- Working in the round (both spiral and joined rounds)
- Basic stitches (sc, hdc, dc, sl st)
- Working into the back loops only (BLO) for structural shaping
- Simple seaming and bead attachment
💡 Designer Tip: Plush velvet yarn can sometimes make individual stitches difficult to see by eye. Rely on your fingers to feel the stitch V-tops and always use a stitch marker at the start of your rounds to stay on track.
Finished Measurements
| Dimension | Inches | Centimeters |
|---|---|---|
| Diameter (Base) | 3.25″ | 8.25 cm |
| Height (Total) | 2.00″ | 5.08 cm |
| Lid Dome Height | 0.75″ | 1.90 cm |
Materials You Will Need
- Yarn: Bulky / Chunky weight (Category 5) velvet yarn
- Hook: US G/6 (4.0 mm) crochet hook
- Notions: 1 clean, washed and dried standard 5 oz tuna can (smooth-edge opened preferred), 3 small white pearl beads (approx. 6mm), sewing needle and matching thread, tapestry needle, stitch markers, polyester fiberfill (small handful for the lid).
| Colorway Name | Yarn Weight | Yardage Needed |
|---|---|---|
| Burgundy | Bulky (Cat 5) Velvet | 35 yds (32 m) |
Yarn Suggestions
| Brand & Line Name | Yarn Weight | Yardage per Skein | Notes |
|---|---|---|---|
| Bernat Velvet | Bulky (Cat 5) | 315 yds / 300g | Incredible sheen, extremely plush, highly recommended. |
| Premier Yarns Parfait Chunky | Bulky (Cat 5) | 120 yds / 100g | Great stitch definition and durable velvet pile. |
| Hobby Lobby Yarnology Velvet | Bulky (Cat 5) | 100 yds / 95g | Soft and budget-friendly. |
⚠️ Note: Avoid novelty eyelash yarns or super-fuzzy mohair for this project, as they make it difficult to feel the structural edges and won’t showcase the clean lines of the upcycled can.
Gauge
| Measurement Type | Stitches / Rows | Over 4 Inches (10 cm) |
|---|---|---|
| Single Crochet (in rounds) | 14 sts x 16 rows | 4″ x 4″ (10 x 10 cm) |
💡 Designer Tip: Gauge is not strictly critical for the base since it fits directly around the metal can, but keeping your tension snug and consistent ensures the metal remains completely hidden.
Abbreviations
| Abbreviation | Full Term |
|---|---|
| ch | chain |
| sc | single crochet |
| hdc | half double crochet |
| dc | double crochet |
| sl st | slip stitch |
| BLO | back loop only |
| inc | increase (work 2 sc in same stitch) |
| inv-dec | invisible decrease |
| st(s) | stitch(es) |
| rnd(s) | round(s) |
Special Stitches Explained
- Picot: Ch 3, insert hook in the back bump and front loop of the first ch, yo, pull through loop and pull through remaining loop on hook.
- Invisible Decrease (inv-dec): Insert hook into the front loop only of the next two stitches, yarn over, pull through both front loops on hook, yarn over, pull through remaining two loops.
Pattern Instructions
Section 1: The Inner Base and Sides (Lining the Can)
Rnd 1: Magic ring, work 6 sc in ring, pull tight to close. (6 sc)
Rnd 2: Inc in each st around. (12 sc)
Rnd 3: [1 sc, inc] 6 times. (18 sc)
Rnd 4: [2 sc, inc] 6 times. (24 sc)
Rnd 5: [3 sc, inc] 6 times. (30 sc)
Rnd 6: [4 sc, inc] 6 times. (36 sc)
Rnd 7: Working in BLO only, sc in each st around. (36 sc)
✅ Checkpoint: At the end of Rnd 7, your piece should form a flat circle with a sharp ridge edge that matches the exact diameter of the bottom of your tuna can.
Rnd 8 to Rnd 16: Sc in each st around. (36 sc per round)
Fasten off, leaving a 6-inch tail. Slip this crocheted cup directly over the outside of your clean tuna can. (Note: You can line the inside as well by working a second identical piece, or leave the clean metal exposed inside).
Section 2: The Domed Lid
Rnd 1: Magic ring, work 6 sc in ring, pull tight to close. (6 sc)
Rnd 2: Inc in each st around. (12 sc)
Rnd 3: [1 sc, inc] 6 times. (18 sc)
Rnd 4: [2 sc, inc] 6 times. (24 sc)
Rnd 5: [3 sc, inc] 6 times. (30 sc)
Rnd 6: [4 sc, inc] 6 times. (36 sc)
Rnd 7 to Rnd 9: Sc in each st around. (36 sc per round)
✅ Checkpoint: Insert a small amount of polyester fiberfill into the dome before closing to create a plush, cushioned top surface.
Rnd 10: [4 sc, inv-dec] 6 times. (30 sc)
Rnd 11: [3 sc, inv-dec] 6 times. (24 sc)
Rnd 12 (Picot Edge): [Sl st in next st, picot, sl st in same st] around. Join with a sl st to first sl st. (24 picots)
Fasten off, weave in all ends securely.
Section 3: Assembly & Finishing
- Take your three small pearl beads and, using sewing thread, securely stitch them in a tight triangle cluster right at the center top of the lid dome.
- Place the completed lid over the top opening of your velvet-covered tuna can. It should rest snugly over the rim, creating a seamless, plush profile.
Size Customization Tips
- To fit a wider can (e.g., a 12 oz tuna or soup can): Continue the flat circle increases in Section 1 (e.g., adding [5 sc, inc] for 42 sts, [6 sc, inc] for 48 sts) until the base matches your tin’s diameter before switching to straight rounds. Adjust the lid circle increases to match the same final stitch count.
- To make it taller: Simply work 3 to 5 additional straight rounds in Section 1 before fastening off.
Care Instructions
Spot clean gently with a damp cloth and mild detergent. Do not submerge in water or place in the washing machine to protect the metal can core. Air dry completely.
Crochet Christmas Gift Idea — Velvet Tuna Can Jewelry Box
Thank you so much for crafting along with me today! I hope this velvet crochet pattern brings a touch of handmade elegance to your holiday gift-giving. If you make your own upcycled crochet gift, please tag me on social media and share your photos using the hashtags #CrochetGiftIdeas, #ChristmasCrochet, #FreeCrochetPattern, #UpcycledCrochet, and #VelvetCrochet. Don’t forget to save this tutorial to your Pinterest boards for quick reference, and drop a comment below letting me know who you are gifting your handmade trinket box to this year!