
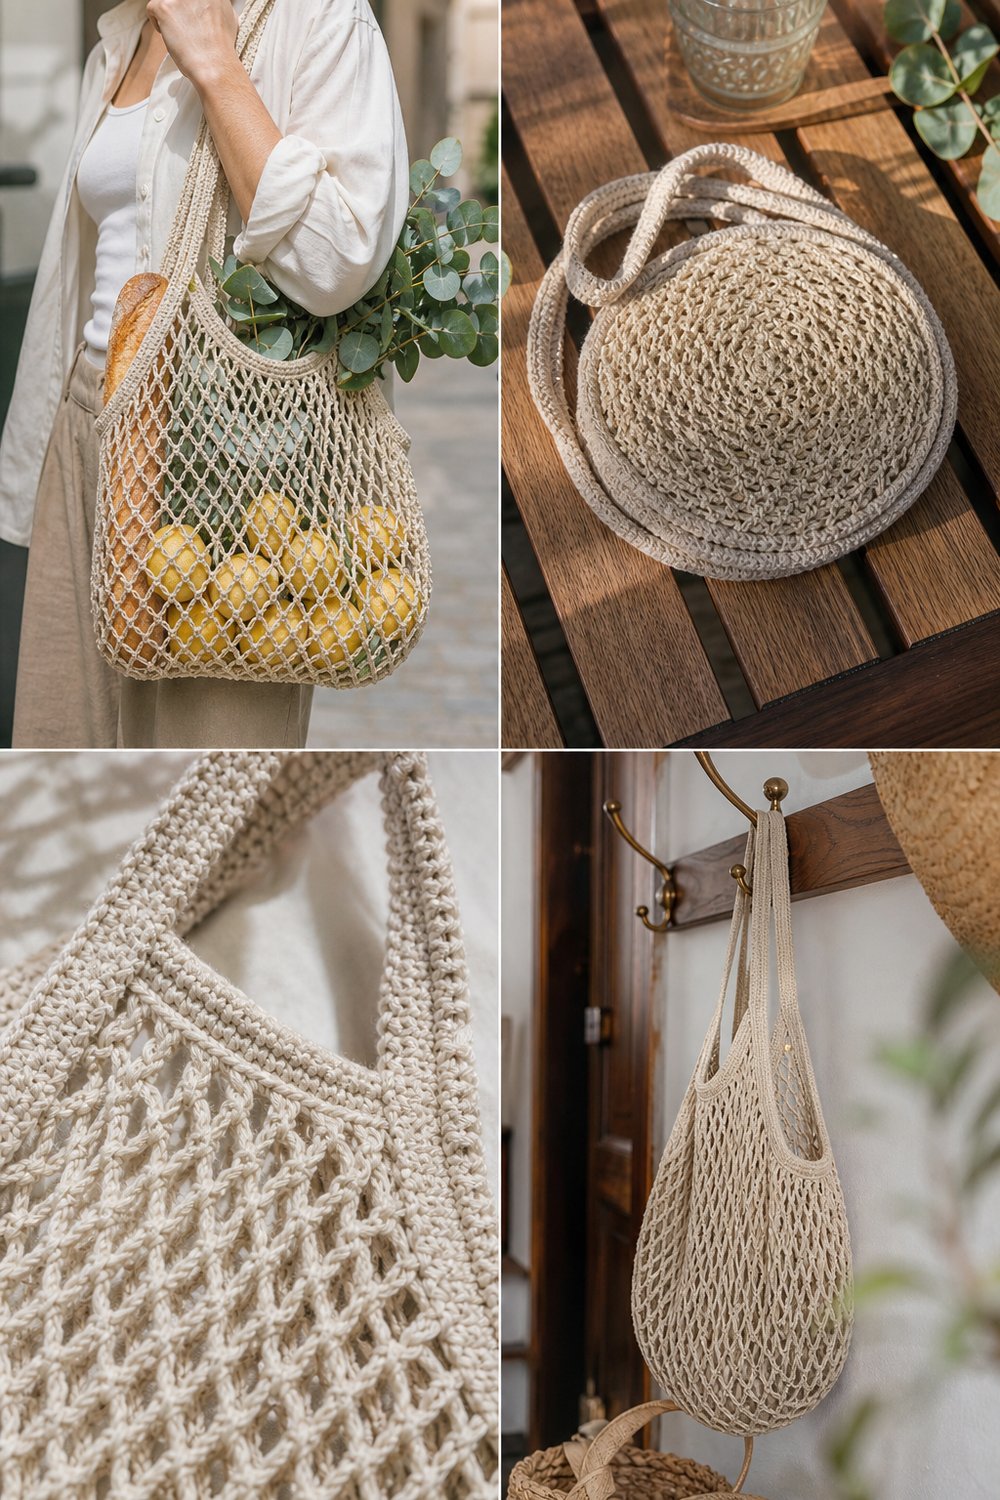
Picture the feeling of strolling through a sun-drenched Saturday morning farmers market, your arm lightly cradling a bag overflowing with vibrant lemons, a warm crusty baguette, and fragrant eucalyptus sprigs. This handmade market tote is designed to capture that effortless lifestyle, combining structured durability with an open, airy mesh that stretches to accommodate your daily finds. Whether hanging from a brass peg by your entryway or collapsing into a compact disc at the bottom of your purse, it is the ultimate blend of boho aesthetic and everyday functionality.
Boho Textured Market Net Tote Bag Free Tote Pattern
Quick Facts
- Stitches Used: ch, sc, dc, tr, v-st, bobble
- Size Fit: One Size (Expandable Market Tote)
- Estimated Hours to Complete: 4–6 hours
- Gift-Appeal Framing: A quick, satisfying weekend project that makes a wonderful, eco-friendly gift for gardeners, market-goers, and zero-waste enthusiasts.
Want to make it larger or smaller? Skip ahead because sizing customization tips are included later in this post.
What Makes This Boho Textured Market Net Tote Bag Special
The secret to this tote’s unique look lies in the pairing of a densely textured, reinforced base with an expandable diamond chain mesh body. While standard market bags often sag when loaded with heavy produce, this design uses sturdy front-post stitches and a reinforced rim to distribute weight evenly across the shoulders. The contrast between the solid textured bottom and the breathable openwork top creates a stunning visual rhythm that looks equally chic whether folded flat on a bistro table or stuffed to the brim with weekly groceries.
Skill Level
- Level: Intermediate
- Required Skills:
- Working in the round (both seamlessly and in spiral fashion where noted)
- Basic increases and decreases
- Working post stitches (FPdc)
- Executing special cluster stitches (bobble)
- Maintaining even tension with sturdy plant-fiber yarns
💡 Designer Tip: If you are new to working with rigid linen-cotton cords, take frequent hand breaks to prevent tension fatigue and maintain a consistent stitch gauge.
Finished Measurements
| Measurement Type | Inches | Centimeters |
|---|---|---|
| Base Diameter | 10 inches | 25.4 cm |
| Bag Depth (Expanded) | 15 inches | 38.1 cm |
| Strap Length (from shoulder) | 12 inches | 30.5 cm |
| Total Hanging Length | 27 inches | 68.6 cm |
Materials You Will Need
- Yarn: Worsted/Aran weight linen-cotton blend or sturdy mercerized cotton cord
- Hook: US Size G/6 (4.00 mm) crochet hook (or size needed to obtain gauge)
- Notions: Stitch markers (4), tapestry needle for weaving ends, measuring tape
| Colorway / Shade | Yarn Type | Yardage Needed |
|---|---|---|
| Color A (Natural Linen) | Linen-Cotton Cord | 350 yds / 320 m |
| Color B (Eucalyptus Sage) | Linen-Cotton Cord | 50 yds / 45 m |
Yarn Suggestions
| Yarn Brand & Line | Weight | Yardage per Skein | Notes |
|---|---|---|---|
| Lion Brand 24/7 Cotton | Worsted (4) | 186 yds / 170 m | Excellent stitch definition, mercerized for durability. |
| Knit Picks Dishie Multi | Worsted (4) | 190 yds / 174 m | 100% cotton, great structure for market bags. |
| Berroco Modern Cotton | Worsted (4) | 209 yds / 191 m | Pima cotton and modal blend with lovely drape. |
⚠️ Note: Avoid using 100% acrylic or super-spongy wool yarns for this project. Acrylic lacks the structural integrity required to hold heavy market loads and will stretch out permanently under weight.
Gauge
| Measurement Type | Stitches & Rows | Dimensions |
|---|---|---|
| Base Gauge | 16 sc x 18 rows | 4 x 4 inches (10 x 10 cm) |
| Mesh Gauge | 3 mesh repeats x 4 rows | 4 x 4 inches (10 x 10 cm) |
💡 Designer Tip: Be sure to swatch in the round using the base pattern to ensure your circular foundation lays completely flat before moving on to the body.
Abbreviations
| Abbreviation | Full Term |
|---|---|
| ch | chain |
| sl st | slip stitch |
| sc | single crochet |
| dc | double crochet |
| tr | treble crochet |
| fpdc | front post double crochet |
| st(s) | stitch(es) |
| sp(s) | space(s) |
| sk | skip |
| yo | yarn over |
| pm | place marker |
| rep | repeat |
| RS | right side |
Special Stitches Explained
- Bobble: [Yo, insert hook in indicated st, yo and pull up loop, yo and draw through 2 loops] 4 times in the same st, yo and draw through all 5 loops on hook.
- V-Stitch (v-st): (1 dc, ch 1, 1 dc) worked in the same indicated stitch or space.
- Diamond Mesh Arc (DMA): Ch 5, sk next ch-1 sp or 3 sts, sc in next st.
Pattern Instructions
Section 1: The Reinforced Base
Using Color A and 4.00 mm hook, magic ring.
– Round 1: Work 8 sc into magic ring, pull closed, join with sl st to first sc. (8 sc)
– Round 2: Ch 1, 2 sc in each st around, join with sl st. (16 sc)
– Round 3: Ch 1, 1 sc in next st, 2 sc in next st; rep from * around, join with sl st. (24 sc)
– Round 4: Ch 1, 1 sc in each of next 2 sts, 2 sc in next st; rep from * around, join with sl st. (32 sc)
– Round 5: Ch 1, 1 sc in each of next 3 sts, 2 sc in next st; rep from * around, join with sl st. (40 sc)
– Round 6: Ch 1, 1 sc in each of next 4 sts, 2 sc in next st; rep from * around, join with sl st. (48 sc)
– Round 7: Ch 1, 1 sc in each of next 5 sts, 2 sc in next st; rep from * around, join with sl st. (56 sc)
– Round 8: Ch 1, 1 sc in each of next 6 sts, 2 sc in next st; rep from * around, join with sl st. (64 sc)
– Round 9: Ch 1, 1 sc in each of next 7 sts, 2 sc in next st; rep from * around, join with sl st. (72 sc)
– Round 10: Ch 1, 1 sc in each of next 8 sts, 2 sc in next st; rep from * around, join with sl st. (80 sc)
– Round 11: Ch 1, 1 sc in each of next 9 sts, 2 sc in next st; rep from * around, join with sl st. (88 sc)
– Round 12: Ch 1, 1 sc in each of next 10 sts, 2 sc in next st; rep from * around, join with sl st. (96 sc)
– Round 13: Ch 1, working in back loops only (BLO), 1 sc in each st around, join with sl st. (96 sc)
– Round 14: Ch 1, working in both loops, 1 fpdc around st directly below in Round 12, 1 sc in next st; rep from * around, join with sl st. (96 sts)*
✅ Checkpoint: Measure your circular base at this stage. It should measure precisely 10 inches across and lie completely flat without cupping or rippling.
Section 2: The Expandable Diamond Mesh Body
- Round 1: Ch 6 (counts as 1 dc + ch 3), sk next 2 sts, sc in next st, ch 5, sk next 3 sts; rep from * around, ending with ch 2 and 1 dc in 3rd st of starting ch-6. (24 mesh arches)*
- Rounds 2–14: Ch 1, sc in same sp, ch 5, sc in next ch-5 arch; rep from * around, ending with ch 2, 1 dc in first sc to align hook at center of arch for the next round. (24 mesh arches per round)*
- Round 15: Switch to Color B. Ch 1, work 1 sc in first arch, ch 3, work 1 Bobble in top of sc from previous round, ch 3, sc in next arch; rep from * around, join with sl st to first sc. (24 bobbles)*
- Round 16: Switch back to Color A. Ch 6, sk ch-3 sp, sc in top of bobble, ch 5, sc in next ch-3 sp; rep from * around, ending with ch 2, 1 dc in 3rd st of starting ch-6. (24 mesh arches)*
- Rounds 17–20: Rep Round 2 pattern four times. (24 mesh arches per round)
✅ Checkpoint: Verify that your mesh body is maintaining an even tension. The diamond pattern should expand smoothly as you pull it horizontally.
Section 3: The Reinforced Rim and Handles
- Round 1: Ch 1, work 2 sc in every ch-5 arch and 1 sc in every sc around, join with sl st. (96 sc)
- Round 2: Ch 1, 1 sc in each st around, join with sl st. (96 sc)
- Round 3 (Handle Setup): Ch 1, work 12 sc, ch 50, sk next 24 sts (for handle opening), work 24 sc, ch 50, sk next 24 sts (for second handle opening), work remaining 12 sc, join with sl st. (72 sc and 100 ch sts)
- Round 4: Ch 1, 1 sc in each sc and 50 sc evenly worked across each ch-50 handle chain, join with sl st. (172 sc)
- Rounds 5–6: Ch 1, 1 sc in each st around, join with sl st. Fasten off securely. (172 sc)
Section 4: Finishing and Assembly
- Using a tapestry needle, weave in all loose ends on the wrong side of the bag, particularly where Color B was joined and fastened off.
- Block your finished bag lightly by dampening the base and stretching the mesh gently to open up the diamond pattern. Allow to dry flat.
Size Customization Tips
- To Make a Smaller Bag: Stop increasing the base at Round 8 (64 sts), then work a multiple of 8 stitches for your mesh body repeat.
- To Make a Larger Bag: Continue base increases up to Round 14 (104 sts), ensuring your total stitch count remains a multiple of 4 to keep the mesh arches symmetrical.
Care Instructions
Hand wash gently in cool water using a mild, eco-friendly wool wash. Do not wring out the mesh body harshly. Instead, roll the damp tote in a clean towel to press out excess moisture, reshape flat on a blocking board or wooden surface, and allow to air dry completely away from direct sunlight.
Boho Textured Market Net Tote Bag Free Tote Pattern
Thank you so much for joining me in making this gorgeous, functional market bag! I hope this pattern brings a touch of handcrafted joy to your weekly grocery runs and weekend adventures.
Be sure to save this post to your Pinterest crochet boards so you can easily find it later. When you finish your bag, please share your photos, tag me on social media, and leave a comment below letting me know which colorway you chose!