
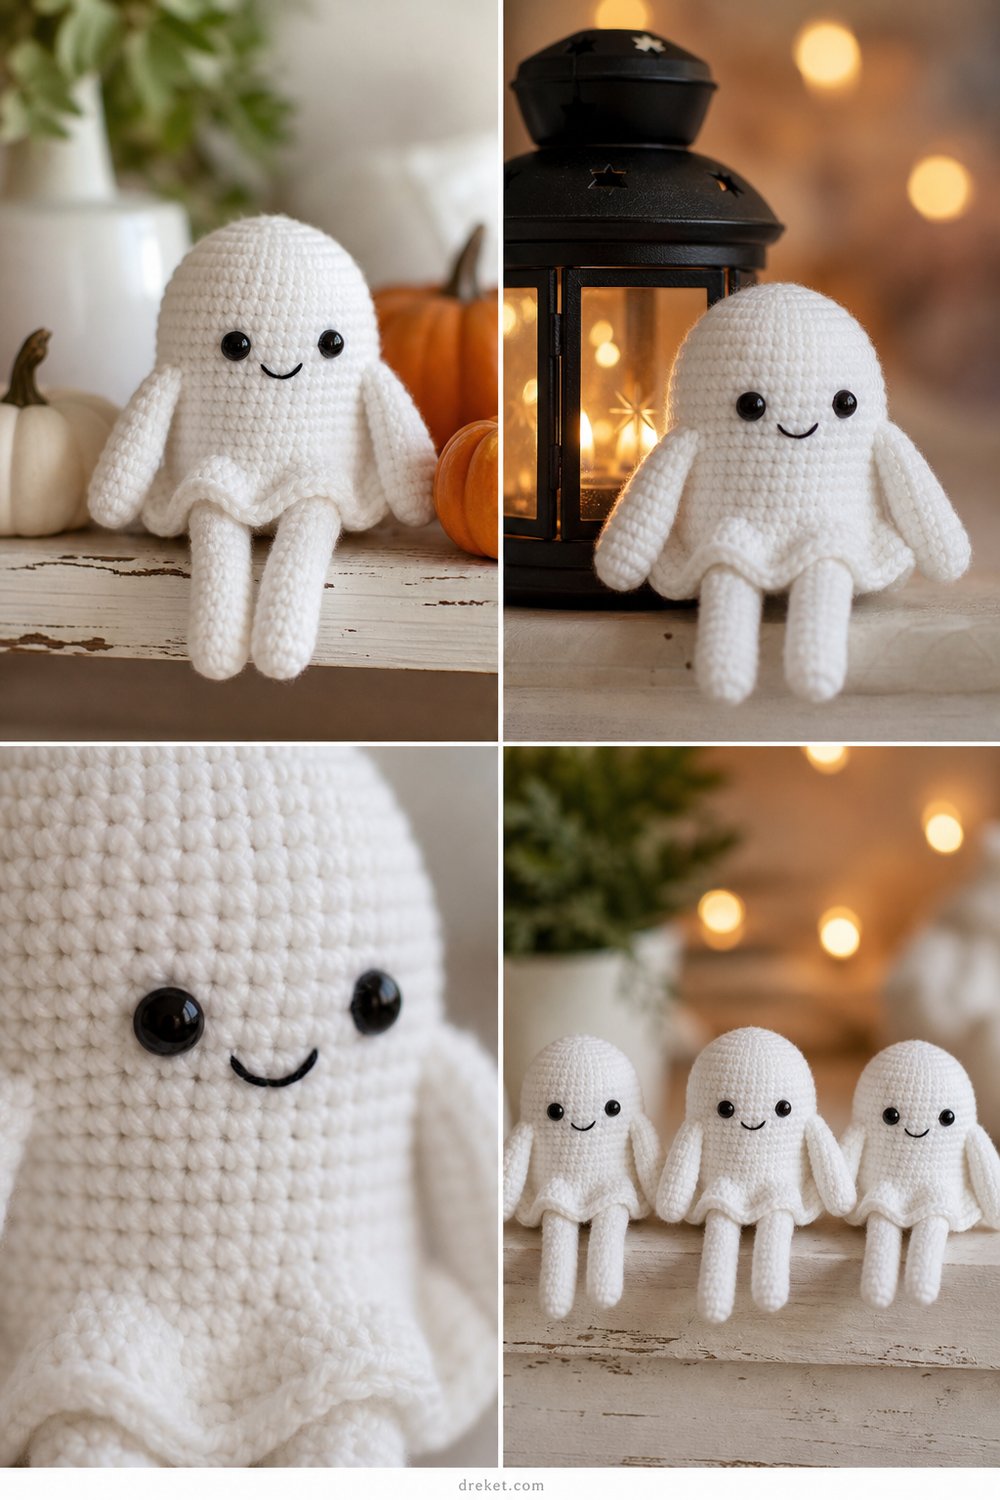
Bring a touch of cozy, whimsical charm to your autumn and Halloween decor with a trio of handmade spirits perched gracefully beside your mini pumpkins and lanterns. With their soft, plump bodies and gently dangling arms, these little amigurumi ghosts add an instant layer of comforting texture and seasonal warmth to any bookshelf or mantelpiece.
Friendly Little Ghost Shelf Sitter Free Crochet Pattern
- Stitches Used: Single crochet, invisible single crochet decrease, increase, surface slip stitch, chain stitch.
- Size Fit: One standard shelf-sitter size, ideal for mantels, bookcases, and tiered trays.
- Estimated Hours to Complete: 2 to 3 hours per ghost.
- Gift-Appeal Framing: Perfect as a quick weekend project, thoughtful housewarming gift for autumn lovers, or a charming market prep item that hooks up in a single afternoon.
Sizing customization tips are included later in the pattern for makers wanting taller or miniature variations.
What Makes This Friendly Little Ghost Shelf Sitter Special
The magic of this design lies in its ultra-clean aesthetic and thoughtful structural details. By utilizing the invisible single crochet decrease throughout the rounded head and tapering body, the stitches remain completely flush and tidy without unsightly gaps or bumps. The arms are constructed as narrow, flexible chains with slip-stitch overlays, allowing them to drape naturally over the edge of any shelf. Finally, working exclusively in the back loops during the base transition creates a sharp, stable ninety-degree flat bottom, ensuring your ghost sits upright securely without the need for heavy weighted pellets.
Skill Level
- Beginner-Friendly Amigurumi
- Working in continuous spirals (amigurumi style)
- Basic amigurumi assembly and sewing parts together
- Simple surface embroidery (for the facial expression)
💡 Designer Tip: Confident beginners who are comfortable with basic shaping and working in the round will find this pattern a breeze to master!
Finished Measurements
| Measurement Type | Inches | Centimeters |
|---|---|---|
| Total Height (Head to Base) | 5.5 inches | 14.0 cm |
| Body Width (At Widest Point) | 3.5 inches | 8.9 cm |
| Arm Length (Each) | 2.5 inches | 6.4 cm |
Materials You Will Need
- Yarn Weight: Sport or Fine weight (#2) 100% cotton yarn for a crisp, defined stitch texture.
- Hook: 2.5 mm crochet hook.
- Notions: Poly-fill stuffing, yarn needle, stitch markers, black embroidery floss, and a sharp embroidery needle.
| Color Name | Exact Color Order | Yarn Weight | Yardage Needed |
|---|---|---|---|
| Snow White | Primary Body | Sport (#2) Cotton | 45 yds (41 m) |
| Jet Black | Facial Embroidery | Embroidery Floss | 2 yds (2 m) |
Yarn Suggestions
| Brand & Line Name | Yarn Weight | Skein Yardage | Notes |
|---|---|---|---|
| Schachenmayr Catania | Sport (#2) | 137 yds (125 m) | Exceptional stitch definition and a crisp matte finish. |
| Hobbii Rainbow Cotton 8/8 | DK (#3) – Adjust hook to 3.0mm | 82 yds (75 m) | Rich color options and incredibly soft hand-feel. |
| Knit Picks CotLin | Sport (#2) | 123 yds (112 m) | Linen-cotton blend with a wonderful rustic drape. |
⚠️ Note: Avoid using fuzzy novelty yarns like eyelash or acrylic fur for this pattern; they obscure the tidy stitch definition required for the signature shelf-sitter look.
Gauge
| Gauge Type | Stitches / Rows | Measurement |
|---|---|---|
| Single Crochet Gauge | 22 sts x 24 rows | 4 inches x 4 inches (10 cm x 10 cm) |
💡 Designer Tip: Be sure to maintain a consistent, firm tension so your poly-fill stuffing does not peek through the stitches. Swatching is recommended if you tend to crochet loosely.
Abbreviations
| Abbreviation | Full Meaning |
|---|---|
| ch | Chain |
| sc | Single crochet |
| inc | Increase (work 2 sc in the same st) |
| inv-dec | Invisible single crochet decrease (insert hook into front loops of next 2 sts, yo, pull through both loops, yo, pull through remaining 2 loops) |
| sl st | Slip stitch |
| BLO | Back loop only |
| FLO | Front loop only |
| st(s) | Stitch(es) |
| rnd(s) | Round(s) |
| FO | Fasten off |
Special Stitches Explained
- Invisible Decrease (inv-dec): Insert your hook into the front loop only of the first stitch, then immediately insert your hook into the front loop only of the second stitch. (You should have 3 loops on your hook). Yarn over and pull through the first 2 loops. Yarn over and pull through the remaining 2 loops.
- Back Loop Only (BLO): Locate the top “V” of the stitch. Insert your hook under only the back loop (furthest away from you), leaving the front loop unworked.
Pattern Instructions
Section 1: The Head and Body
Using Snow White, work in a continuous spiral without joining rounds. Place a stitch marker in the first stitch of each round to keep track.
- Rnd 1: Magic ring, 6 sc into the ring. (6 sts)
- Rnd 2: [Inc] 6 times. (12 sts)
- Rnd 3: [Sc 1, inc] 6 times. (18 sts)
- Rnd 4: [Sc 2, inc] 6 times. (24 sts)
- Rnd 5: [Sc 3, inc] 6 times. (30 sts)
- Rnd 6: [Sc 4, inc] 6 times. (36 sts)
- Rnd 7: [Sc 5, inc] 6 times. (42 sts)
- Rnds 8–14 (7 rounds): Sc in each st around. (42 sts)
- Rnd 15: [Sc 5, inv-dec] 6 times. (36 sts)
- Rnd 16: Sc in each st around. (36 sts)
- Rnd 17: [Sc 4, inv-dec] 6 times. (30 sts)
- Rnds 18–19 (2 rounds): Sc in each st around. (30 sts)
- Rnd 20: [Sc 3, inv-dec] 6 times. (24 sts)
- Rnds 21–22 (2 rounds): Sc in each st around. (24 sts)
- Rnd 23: [Sc 2, inv-dec] 6 times. (18 sts)
- Rnd 24: Sc in each st around. (18 sts)
- Begin stuffing the head and upper body firmly with poly-fill, shaping it into a smooth, rounded dome. Continue stuffing lightly as you go.
✅ Checkpoint: At the end of Rnd 24, your piece should measure approximately 4 inches in height and have exactly 18 stitches around.
- Rnd 25: [Sc 1, inc] 9 times to flare out the skirt base. (27 sts)
- Rnd 26: [Sc 2, inc] 9 times. (36 sts)
- Rnd 27: [Sc 3, inc] 9 times. (45 sts)
- Rnd 28: Working in BLO only, sc in each st around. (45 sts)
- Rnd 29: [Sc 4, inc] 9 times. (54 sts)
- Rnds 30–31 (2 rounds): Sc in each st around. (54 sts)
- Rnd 32: [Sc 7, inv-dec] 6 times. (48 sts)
- Rnd 33: Sc in each st around. (48 sts)
- FO, leaving a long tail of yarn for closing the base flat. Stuff the lower skirt body completely, ensuring the bottom is packed firmly so the ghost can sit upright on a flat surface.
Section 2: The Base Closure
- Thread your yarn tail onto your tapestry needle.
- Whipstitch through the front loops of Rnd 33 while pulling snug to create a flat, neat base foundation. Weave in all remaining ends securely inside the body.
Section 3: Dangly Arms (Make 2)
Using Snow White:
- Ch 12.
- Row 1: Starting in the 2nd ch from the hook, work 1 sl st in each ch back down to the base. (11 sl sts)
- FO, leaving a 6-inch tail for sewing.
Section 4: Assembly and Embroidery
- Facial Embroidery: Using Jet Black embroidery floss and a sharp needle, embroider a gentle, simple curved smile and two small French knot eyes centered between Rnds 10 and 13 of the head.
- Attaching Arms: Position the flat top of each dangly arm on either side of the body just below Rnd 17. Securely sew them in place using the yarn tails, weaving in all ends inside the body cavity.
Size Customization Tips
- To make a larger shelf sitter: Switch to a DK or Worsted weight yarn with a 3.5mm or 4.0mm hook. This will increase the overall height by roughly 2 inches and create a broader, chunkier silhouette.
- To make a miniature ornament: Drop down to a Thread size #10 crochet hook and lace-weight cotton yarn, yielding a petite 2.5-inch ghost perfect for holiday tree hanging.
Care Instructions
- Spot clean gently with a damp cloth and mild soap as needed.
- Do not submerge fully in water if heavy poly-fill is packed tightly inside.
- Air dry flat away from direct sunlight to preserve the crisp white cotton color.
Closing
Thank you so much for stitching along with the Friendly Little Ghost Shelf Sitter Free Crochet Pattern! I hope these little spirits bring an abundance of cozy, autumnal joy to your home decor this season.
I would love to see your handmade ghosts perched on your shelves! Please be sure to share your photos, tag me on social media, save this project to your favorite Pinterest boards, and leave a comment below to let me know how your little ghosties turned out. Happy crocheting!