
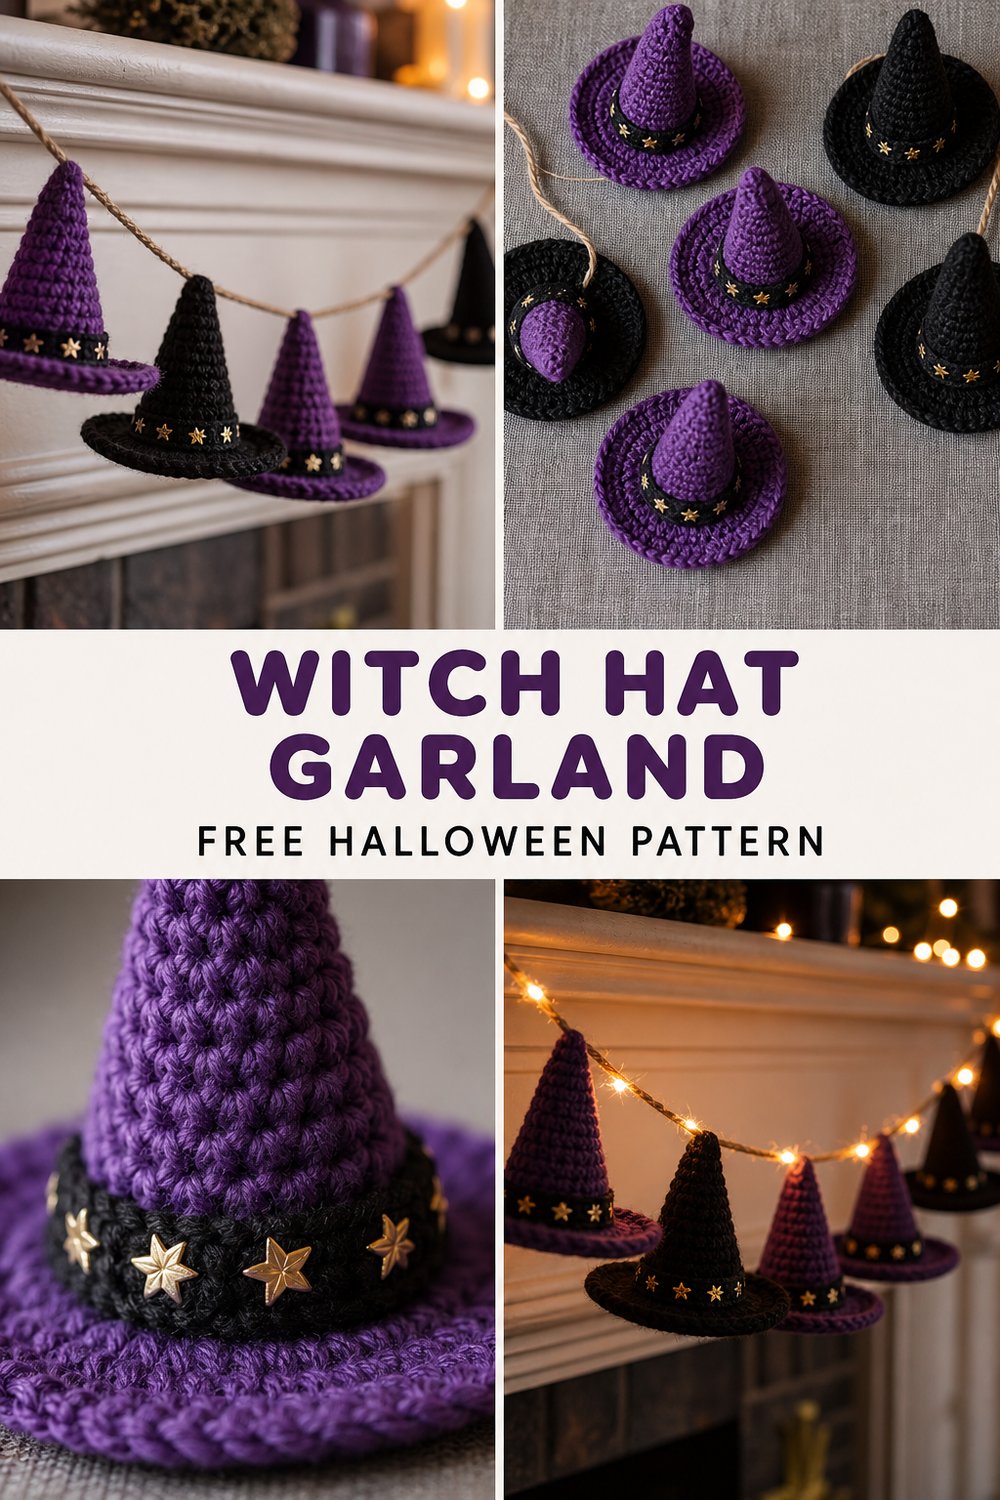
Transform your mantel into a cozy, magical corner this autumn with a string of handmade mini accessories that capture all the whimsical charm of the season. Featuring jaunty pointed crowns, star-dusted bands, and warm flickering fairy lights weaving through plum and obsidian stitches, this festive display brings handmade magic right to your living room.
Purple Witch Hat Garland Free Crochet Pattern
Quick Facts
- Stitches Used: Chain, Single Crochet, Half Double Crochet, Double Crochet, Front Post Single Crochet, Slip Stitch
- Size Fit: One-size adjustable garland (approx. 5 feet / 152 cm long with 6 hats)
- Estimated Hours to Complete: 4–5 hours total
- Gift-Appeal Framing: A quick, satisfying weekend project that makes a wonderful housewarming gift for Halloween enthusiasts or a charming heirloom piece for your own family traditions.
Sizing customization tips are included later in this guide to help you lengthen or shorten your garland to fit any space.
What Makes This Purple Witch Hat Garland Special
This design achieves its crisp, professional look through a combination of clever shaping and structural integrity. Working in continuous spirals (amigurumi style) for the plum crowns creates a dense, sturdy fabric that holds its jaunty tip without needing heavy stuffing or wire armature. The contrasting black brims are worked with an increased hook tension and a special post-stitch band technique to create a clean, crisp line that mimics a real felt hat. Finally, the seamless joining method allows you to slide the hats along your hanging cord or fairy lights so you can space them out precisely to fit your mantel or bookshelf.
Skill Level
- Skill Level: Intermediate
- Magic ring technique
- Working in the round (continuous spirals)
- Front post stitches
- Basic assembly and weaving in ends
💡 Designer Tip: If you are comfortable working basic amigurumi shapes like small cones and flat circles, you will breeze right through this pattern!
Finished Measurements
| Measurement Type | Inches | Centimeters |
|---|---|---|
| Individual Hat Height | 4.5 inches | 11.5 cm |
| Individual Hat Brim Diameter | 4.0 inches | 10.0 cm |
| Total Garland Length (6 Hats) | 60.0 inches | 152.4 cm |
| Hanging Cord Length | 72.0 inches | 182.8 cm |
Materials You Will Need
- Yarn Weight: Sport or light Worsted weight (#2 or #3) yarn
- Hook: US C/2 (2.75 mm) crochet hook (or size needed to obtain stiff gauge)
- Notions: Yarn needle, stitch marker, scissors, warm white fairy light string (optional), small yellow embroidery floss for stars (optional).
| Color Name / Order | Yarn Weight | Yardage Needed |
|---|---|---|
| Color A: Deep Plum | Sport / DK | 85 yds / 78 m |
| Color B: Obsidian Black | Sport / DK | 60 yds / 55 m |
| Color C: Star Dust Yellow | Embroidery Floss / Fingering | 15 yds / 14 m |
| Color D: Natural Jute / Twine | Worsted / Cord | 25 yds / 23 m |
Yarn Suggestions
| Brand & Line Name | Yarn Weight | Yardage per Skein | Notes |
|---|---|---|---|
| Knit Picks CotLin | DK (Sport/DK) | 123 yds / 112 m | Linen-cotton blend offers crisp stitch definition and zero stretch sag. |
| Lion Brand Coboo | DK | 232 yds / 212 m | Wonderful drape and rich jewel-tone shades of purple and black. |
| Scheepjes Catona | Fingering | 137 yds / 125 m | 100% mercerized cotton; creates ultra-crisp, rigid hat tips (use smaller hook). |
⚠️ Note: Avoid loose, fuzzy acrylic yarns for this project. The lack of stitch definition hides the structural lines of the hat crowns and brims.
Gauge
| Gauge Type | Stitches / Rows | Measurements |
|---|---|---|
| Crown Base Gauge | 6 sc x 6 rows | 1 inch x 1 inch (2.5 cm x 2.5 cm) |
| Brim Circle Gauge | First 3 rounds of brim | 2.5 inches (6.3 cm) diameter |
⚠️ Note: Be sure to swatch and check your gauge! A tighter tension ensures your witch hat crowns stand up straight without flopping over.
Abbreviations
| Abbreviation | Full Term |
|---|---|
| ch | Chain |
| sc | Single Crochet |
| hdc | Half Double Crochet |
| dc | Double Crochet |
| fpsc | Front Post Single Crochet |
| sl st | Slip Stitch |
| sc2tog | Single Crochet 2 Stitches Together (Decrease) |
| st(s) | Stitch(es) |
| Rnd | Round |
| MR | Magic Ring |
| [ ] | Repeat instructions inside brackets |
Special Stitches Explained
- Front Post Single Crochet (fpsc): Insert hook from front to back to front around the post of the indicated stitch, yarn over, pull up a loop, yarn over, and pull through both loops on the hook.
- Invisible Join: Cut yarn leaving a 6-inch tail. Thread tail onto yarn needle, skip the next stitch, insert needle under both loops of the following stitch from front to back, and pull through. Insert needle back through the top of the final stitch worked from front to back to create a faux stitch.
Pattern Instructions
Make 6 identical hats for the standard garland length. Work in continuous rounds without joining unless otherwise stated; use a stitch marker to track the first stitch of each round.
### Section 1: The Plum Crown
Using Color A (Deep Plum):
- Rnd 1: Begin with a MR, work 6 sc into the ring. (6 sc)
- Rnd 2: [sc in next st, 2 sc in next st] 3 times. (9 sc)
- Rnd 3: Sc in each st around. (9 sc)
- Rnd 4: [sc in next 2 sts, 2 sc in next st] 3 times. (12 sc)
- Rnd 5: Sc in each st around. (12 sc)
- Rnd 6: [sc in next 3 sts, 2 sc in next st] 3 times. (15 sc)
- Rnds 7–8: Sc in each st around. (15 sc)
- Rnd 9: [sc in next 4 sts, 2 sc in next st] 3 times. (18 sc)
- Rnds 10–11: Sc in each st around. (18 sc)
- Rnd 12: [sc in next 5 sts, 2 sc in next st] 3 times. (21 sc)
- Rnds 13–14: Sc in each st around. (21 sc)
- Rnd 15: [sc in next 6 sts, 2 sc in next st] 3 times. (24 sc)
- Rnds 16–17: Sc in each st around. (24 sc)
✅ Checkpoint: At the end of Rnd 17, your crown should measure approximately 4 inches tall with a stable, pointed tip. Verify you have 24 sc before moving to the brim.
### Section 2: The Obsidian Brim & Band
Fasten off Color A and join Color B (Obsidian Black) in the front loop only of any stitch on Rnd 17.
- Rnd 18 (Brim Base – working in FLO): Ch 1, working in Front Loops Only, [sc in next 3 sts, 2 sc in next st] around. Sl st to first st to join. (30 sc)
- Rnd 19: Ch 1, working in Both Loops, [sc in next 4 sts, 2 sc in next st] around. Sl st to join. (36 sc)
- Rnd 20: Ch 1, working in Back Loops Only, [sc in next 5 sts, 2 sc in next st] around. Sl st to join. (42 sc)
- Rnd 21: Ch 1, [hdc in next 6 sts, 2 hdc in next st] around. Sl st to join. Fasten off with an Invisible Join. (48 hdc)
Band Detail: Return to the unworked Back Loops of Rnd 17 (where you started the brim). Join Color B and work 1 fpsc around each stitch of Rnd 17 to create a raised textured hatband. Fasten off and weave in all ends securely inside the crown.
### Section 3: Star Embellishments
Using Color C (Star Dust Yellow) and your yarn needle, embroider small French knots and 5-point star stitches scattered haphazardly around the base of the plum crown just above the black brim band.
### Section 4: Garland Assembly
- Cut a length of Color D (Natural Jute / Twine) measuring 72 inches (182.8 cm).
- Weave the jute cord (or alternate it through your fairy light string) in and out through the back loops of Rnd 18 on each hat, spacing them approximately 6 inches apart with 12 inches of empty hanging cord on each end.
- Adjust the hats so they all face forward, and secure the top loop of each hat to the cord with a tiny stitch of matching yarn if desired to prevent sliding.
Size Customization Tips
- Want a longer garland? Simply repeat Section 1 and Section 2 to create 8 or 10 hats instead of 6. Add roughly 8 inches (20 cm) of total garland length per additional hat.
- Want larger statement hats? Use a worsted weight yarn (#4) with a US H/8 (5.0 mm) hook and work an extra 4 increase rounds on the crown to increase the finished hat height by 2 inches (5 cm).
Care Instructions
- Spot clean gently with a damp cloth and mild soap.
- Do not submerge in water if using non-washable decorative cords or un-treated natural fibers.
- Lay flat to dry away from direct sunlight.
- Store flat wrapped in acid-free tissue paper between seasons to keep the hat points crisp and jaunty.
Closing
Purple Witch Hat Garland
I hope you had so much fun stitching up this magical Purple Witch Hat Garland Free Crochet Pattern! There is nothing quite like cozying up your home with handmade decor that you can pull out year after year.
If you make your own garland, please share your creation with me! Tag me on social media using @YourDesignHandle and use the hashtag #PurpleWitchHatGarland so I can admire your spooky-chic mantel displays. Be sure to pin this pattern to your favorite Halloween crochet board on Pinterest, and drop a comment below letting me know what color combination you chose for your witches! Happy crocheting!