
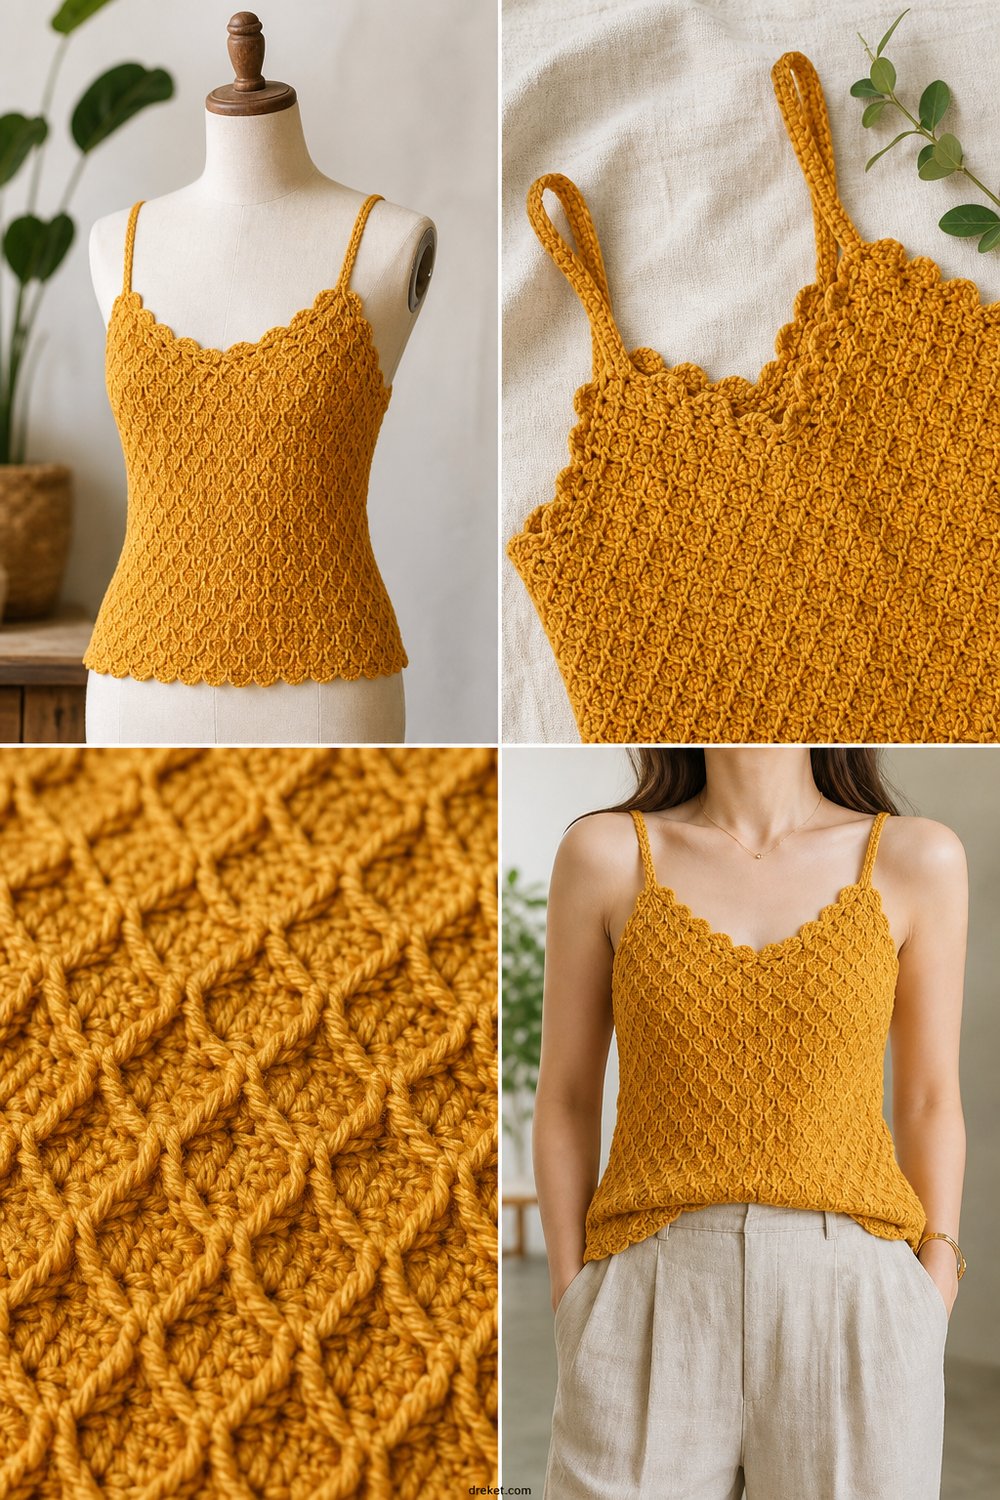
Step into the sun-drenched days of summer with a handcrafted garment that brings effortless sophistication to your warm-weather wardrobe. This chic, tactile camisole blends airy comfort with a striking architectural stitch that catches the light and demands a second look.
Honeycomb Textured Camisole Tank Top Free Camisole Pattern
Quick Facts
Stitches Used: Chain, single crochet, double crochet, front post double crochet (FPdc), and special honeycomb cluster sts.
Size Fit: Inclusive range from XS to XXL, designed with 1-2 inches of positive ease for a flattering, tailored fit.
Estimated Hours to Complete: 12 to 16 hours of relaxing, engaging crochet.
Gift-Appeal: An absolute showstopper for birthdays, summer getaways, or treating yourself to a luxury handmade staple.
💡 Designer Tip: Read through the entire pattern before casting on, especially the special stitch definitions, to ensure your tension remains consistent throughout the honeycomb panels.
Sizing customization tips are included later in the pattern to help you adjust the fit effortlessly.
What Makes This Honeycomb Textured Camisole Special
The true magic of this design lies in the striking raised honeycomb textured stitch, created by artfully combining front-post double crochets and skipped stitches to build a deeply tactile, sculptural fabric. Unlike flat summer tops, this stitch play yields a rich cotton relief that holds its structure beautifully while remaining breathable. Framed by a delicate, airy scalloped edging along the neckline and supported by clean, reinforced shoulder straps, this top transitions seamlessly from a casual daytime stroll paired with linen trousers to an elevated evening out.
Skill Level
- Intermediate
- Required Skills:
- Working in rows and in the round
- Basic post-stitch manipulation (FPdc)
- Reading written crochet instructions and stitch charts (optional)
- Counting sts accurately over textured stitch patterns
⚠️ Note: If you are comfortable with basic post stitches and keeping track of stitch counts across multi-row repeats, you will find this project an absolute joy to stitch up.
Finished Measurements
| Size | Bust Circumference (Inches) | Finished Length (Inches) | Bust Circumference (cm) | Finished Length (cm) |
|---|---|---|---|---|
| XS | 32″ | 20″ | 81 cm | 51 cm |
| S | 36″ | 20.5″ | 91.5 cm | 52 cm |
| M | 40″ | 21″ | 101.5 cm | 53.5 cm |
| L | 44″ | 21.5″ | 112 cm | 54.5 cm |
| XL | 48″ | 22″ | 122 cm | 56 cm |
| XXL | 52″ | 22.5″ | 132 cm | 57 cm |
Materials You Will Need
- Yarn: Sport weight (Category 2) 100% mercerized cotton yarn for optimal stitch definition and drape.
- Hook: US D/3 (3.25 mm) crochet hook (or size needed to obtain gauge).
- Notions: Tapestry needle for weaving in ends, locking stitch markers (4), measuring tape.
| Color Name | Color Order | Yarn Weight | Yardage Needed |
|---|---|---|---|
| Amber Yellow | 1 | Sport (2) | 750 (820, 900, 980, 1060, 1150) yds |
| Cream | 2 (Edging & Straps) | Sport (2) | 120 (130, 140, 150, 160, 170) yds |
Yarn Suggestions
| Brand & Line Name | Yarn Weight | Skein Yardage | Notes |
|---|---|---|---|
| Lion Brand Coboo | Sport (3 – light) | 232 yds / 100g | Incredible drape, though check gauge carefully as bamboo/cotton blends have more slip. |
| Hobbii Rainbow Cotton 8/8 | DK/Sport | 82 yds / 50g | Crisp stitch definition; adjust hook size if using true DK weight. |
| Knit Picks Comfy Sport | Sport (2) | 136 yds / 50g | Exceptional cotton-acrylic blend with a soft matte finish and great memory. |
⚠️ Note: Avoid heavy 100% wool or fuzzy novelty yarns for this pattern; they obscure the honeycomb texture and make the garment too warm for summer wear.
Gauge
- Honeycomb Pattern: 22 sts and 16 rows = 4 inches (10 cm) using US D/3 (3.25 mm) hook.
| Measurement Type | Stitches / Rows | Imperial | Metric |
|---|---|---|---|
| Stitch Gauge | 22 sts | 4 inches | 10 cm |
| Row Gauge | 16 rows | 4 inches | 10 cm |
💡 Designer Tip: Always make and block your swatch before starting. The honeycomb stitch contracts slightly after washing, so accurate gauge ensures your finished camisole fits like a glove.
Abbreviations
| Abbreviation | Full Meaning |
|---|---|
| ch | chain |
| sc | single crochet |
| dc | double crochet |
| FPdc | front post double crochet |
| sl st | slip stitch |
| st(s) | stitch(es) |
| sk | skip |
| rep | repeat |
| RS | right side |
| WS | wrong side |
| pm | place marker |
Special Stitches Explained
- Front Post Double Crochet (FPdc): Yarn over, insert hook from front to back to front around the post of the designated stitch two rows below, yarn over, pull up a loop, (yarn over, pull through 2 loops) twice.
- Honeycomb Mesh Unit (HcU): [1 dc in next st, ch 2, sk next 2 sts] rep across as indicated.
- Scallop Edging (Scallop): Work (2 dc, ch 1, 2 dc) into the same indicated stitch or space, sk next 2 sts, sl st into next st.
Pattern Instructions
Section 1: Lower Body Panel (Worked Flat in Rows)
Using Color 1 (Amber Yellow) and US D/3 (3.25 mm) hook, ch 178 (202, 226, 250, 274, 298).
Row 1 (RS): 1 sc in 2nd ch from hook, 1 sc in each ch across, turn. (177, 201, 225, 249, 273, 297 sc)
Row 2 (WS): Ch 1, 1 sc in first st, ch 2, sk 2 sts, 1 sc in next st; rep from * across, turn. (59, 67, 75, 83, 91, 99 ch-2 spaces)
Row 3: Ch 3 (counts as first dc here and throughout), 1 dc in first ch-2 sp, 1 FPdc around the sc 2 rows below (enclosing the ch-2 sp of Row 2), 2 dc in next ch-2 sp; rep from * across, turn. (177, 201, 225, 249, 273, 297 sts)
Row 4: Ch 1, 1 sc in first st, ch 2, sk 2 sts, 1 sc in next st; rep from * across, turn. (59, 67, 75, 83, 91, 99 ch-2 spaces)
Rows 5–36: Rep Rows 3 and 4 sixteen more times, establishing the honeycomb pattern. Fasten off Color 1. (177, 201, 225, 249, 273, 297 sts)*
✅ Checkpoint: At the end of Row 36, lay your piece flat. The honeycomb texture should be crisp, uniform, and measure approximately 9 inches in height.
Section 2: Upper Bodice Shaping (Front & Back)
Working now on the Front Panel, rejoin Color 1 at the 15th st from the right edge.
Row 1: Ch 1, work in established honeycomb pattern across the next 81 (93, 105, 117, 129, 141) sts, leaving remaining sts unworked, turn. (81, 93, 105, 117, 129, 141 sts)
Row 2 (Neckline Decrease): Sl st across first 6 sts, ch 1, work honeycomb pattern to last 6 sts, turn, leaving last 6 sts unworked. (69, 81, 93, 105, 117, 129 sts)
Rows 3–12: Continue in established pattern, decreasing 2 sts at each neck edge every RS row. (49, 61, 73, 85, 97, 109 sts)
Fasten off. Repeat the exact same shaping for the Back Panel.
Section 3: Shoulder Straps
Join Color 2 (Cream) at the top outer corner of the Front Panel.
Row 1: Ch 1, sc evenly across the top 6 edge sts, turn. (6 sc)
Rows 2–30: Ch 1, 1 sc in each st across, turn. (6 sc)
Fasten off, leaving a long tail for sewing. Repeat for the second front strap and both back straps. Sew front straps to corresponding back straps using a mattress stitch.
Section 4: Edging and Assembly
With RS facing, join Color 2 (Cream) at the left side seam.
Round 1: Working evenly around the entire neckline and armhole openings, work 1 round of sc, placing approx. 3 sc per honeycomb block edge, sl st to join in first st. (Stitch count varies by size)
Round 2: *Work Scallop Edging [2 dc, ch 1, 2 dc] in indicated st, sk 2 sts, sl st in next st; rep from * all around neckline and armhole edges, sl st to join. Fasten off.
Weave in all remaining ends securely with your tapestry needle.
✅ Checkpoint: Inspect all seams, shoulder joins, and scalloped edges to ensure all yarn ends are trimmed and knots are secure before blocking.
Size Customization Tips
- To Adjust Length: Add or subtract pattern repeats in Section 1 (Rows 3 and 4) in increments of 2 rows. Each 2-row repeat adds approximately 0.5 inches (1.25 cm) to the total length.
- To Adjust Width: Because the honeycomb stitch requires a multiple of 4 + 3 sts, adjust your starting chain accordingly. Adding one 4-stitch repeat increases the bust circumference by roughly 0.75 inches (2 cm).
Care Instructions
- Hand wash gently in cool water using a mild, wool-safe detergent.
- Do not bleach or wring out the fabric.
- Roll gently in a clean towel to remove excess moisture.
- Lay flat to dry on a blocked surface, shaping the honeycomb texture carefully while damp.
- Cool iron if needed, avoiding direct heavy pressure over raised post stitches.
Honeycomb Textured Camisole Tank Top Free Camisole Pattern
Thank you so much for spending your creative time with me today! I hope you adore stitching and wearing your new honeycomb camisole as much as I loved designing it for you. If you share your lovely makes on social media, please tag me and use the hashtag #HoneycombCamisole so I can celebrate your gorgeous color choices and stitches. Be sure to save this tutorial to your Pinterest summer crochet boards so you can easily find it later, and leave a comment below to let me know which colorway you chose! Happy crocheting!