
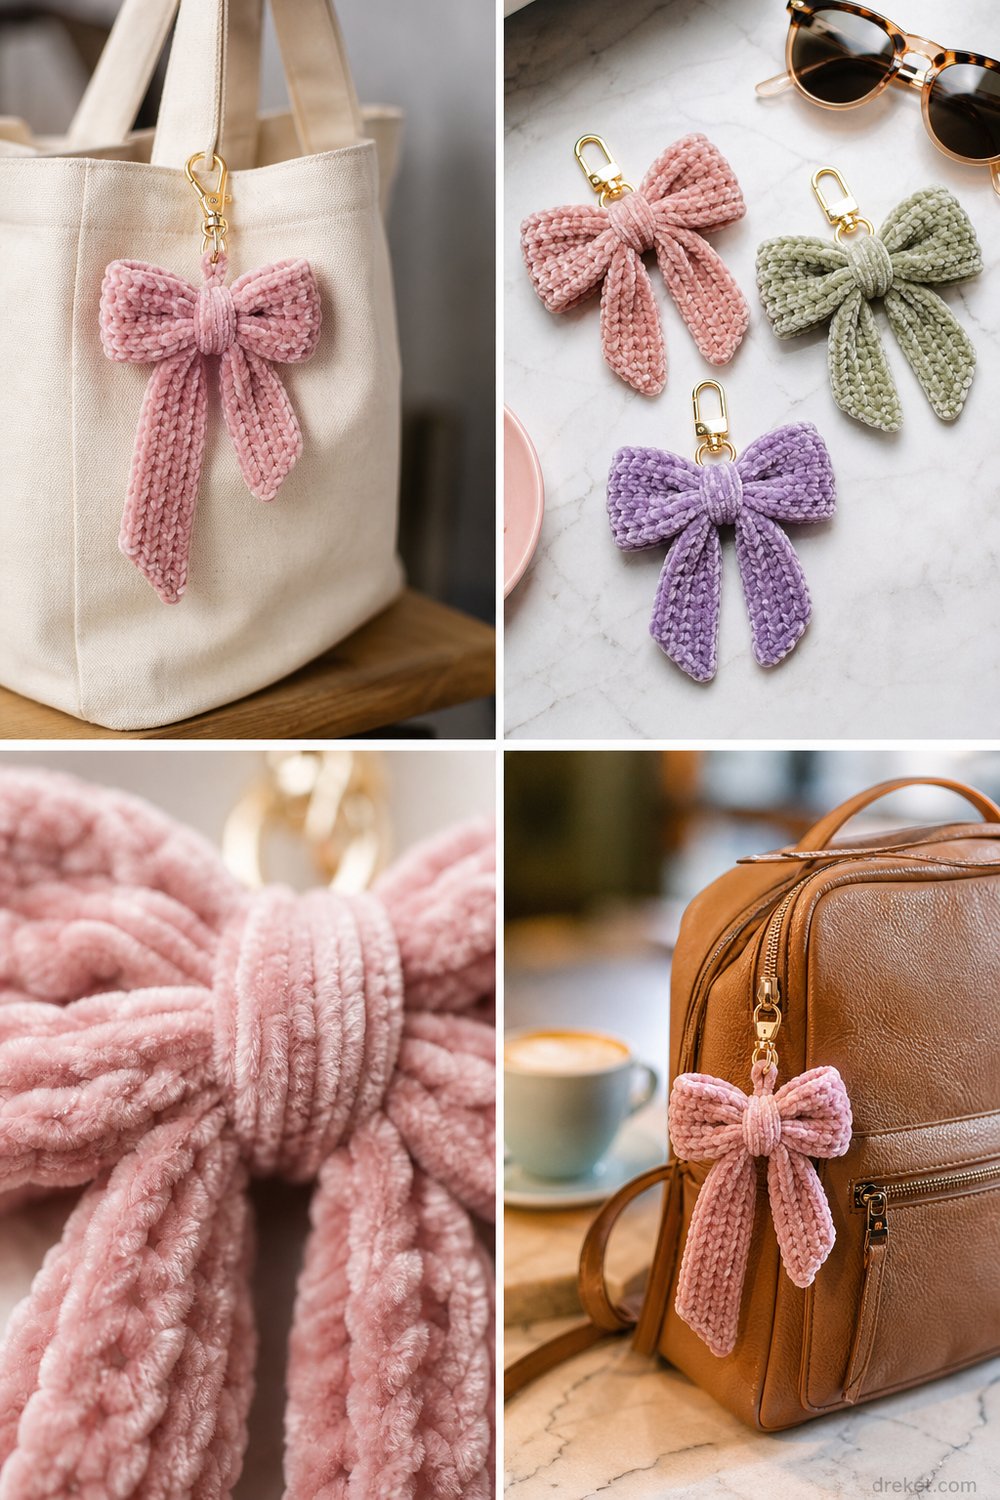
Elevate your everyday accessories with a touch of plush luxury, turning a simple canvas tote or leather backpack into a statement piece. This quick-make project brings rich chenille texture and timeless style to your favorite bags in just one sitting.
Delicate Velvet Ribbon Bag Charm Free Bag Pattern
Quick Facts
Stitches Used: Chain (ch), Slip Stitch (sl st), Single Crochet (sc), Half Double Crochet (hdc), Double Crochet (dc), Front Post Double Crochet (fptr).
Size Fit: One size accessory (fits any bag handle or zipper pull).
Estimated Hours to Complete: 1 to 2 hours.
Gift-Appeal Framing: Perfect for quick-gifting, stocking stuffers, craft fairs, or stash-busting leftover velvet yarn.
Sizing customization tips are included later in the pattern to help you scale the bow and ribbon tails up or down.
What Makes This Delicate Velvet Ribbon Bag Charm Special
This design relies on the plush, light-catching properties of super-bulky velvet chenille yarn to create a high-end look with minimal effort. Instead of complex shaping, the bow is constructed from simple rectangular panels folded and cinched with a tightly wrapped center band, giving it crisp, dimensional structure. The hanging ribbon tails are worked with a clean diagonal cut edge and subtle ribbed texture, ensuring they hold their graceful shape rather than flopping limply. A sturdy gold-tone lobster clasp hardware anchors the piece, making it effortlessly swappable between your favorite cream canvas tote and leather travel backpack.
Skill Level
Skill Level: Advanced Beginner
- Working with super-bulky velvet yarn and identifying stitches by feel
- Basic seaming and wrapping techniques
- Attaching hardware securely to crochet pieces
💡 Designer Tip: Chenille yarn can be slippery and hides its stitches in low light. Work under a bright lamp and run your fingers along the top of your stitches to easily locate the loops!
Finished Measurements
| Component | Imperial (Inches) | Metric (Centimeters) |
|---|---|---|
| Bow Width | 5.5 inches | 14.0 cm |
| Bow Height | 3.5 inches | 9.0 cm |
| Ribbon Tail Length | 7.0 inches | 17.8 cm |
| Ribbon Tail Width | 1.25 inches | 3.2 cm |
| Total Hanging Length | 10.5 inches | 26.7 cm |
Materials You Will Need
- Yarn: Super Bulky (Weight 6) velvet/chenille yarn. Exact color breakdown below.
- Crochet Hook: US M/13 (9.0 mm) crochet hook.
- Notions: Tapestry needle for weaving ends, locking stitch markers, scissors, 1 golden swivel lobster clasp (approx. 1.5 inches / 3.8 cm long).
| Color Name | Colorway Order | Yarn Weight | Yardage / Meters Needed |
|---|---|---|---|
| Blush Pink | 1 (Primary Bow & Tails) | Super Bulky (6) | 30 yds / 27 m |
| Sage Green | 2 (Alternative Color) | Super Bulky (6) | 30 yds / 27 m |
| Lilac | 3 (Alternative Color) | Super Bulky (6) | 30 yds / 27 m |
Yarn Suggestions
| Brand & Line Name | Yarn Weight | Skein Yardage | Notes |
|---|---|---|---|
| Bernat Velvet | Super Bulky (6) | 315 yds / 288 m | Excellent plush texture, rich sheen, holds structure well. |
| Premier Yarns Retro Velvet | Super Bulky (6) | 90 yds / 82 m | Great smaller skein size for accessories, highly durable pile. |
| Hobbii Honey Bunny | Super Bulky (6) | 131 yds / 120 m | Ultra-soft, dense chenille that minimizes shedding. |
⚠️ Note: Avoid novelty eyelash yarns or extremely fuzzy mohair blends for this pattern, as they will obscure the clean structure of the bow and make cinching the center knot difficult.
Gauge
- Gauge: 8 sts and 7 rows = 4 inches (10 cm) in single crochet using a 9.0 mm hook.
- Note: Exact gauge is not critical for this accessory, but matching the tight, dense tension will ensure your bow holds its shape upright without drooping.
| Measurement | Stitches | Rows |
|---|---|---|
| 4×4 in / 10×10 cm | 8 sc | 7 rows |
Abbreviations
| Abbreviation | Meaning |
|---|---|
| ch | Chain |
| sl st | Slip Stitch |
| sc | Single Crochet |
| hdc | Half Double Crochet |
| dc | Double Crochet |
| fptr | Front Post Double Crochet |
| st(s) | Stitch(es) |
| rep | Repeat |
| RS | Right Side |
| WS | Wrong Side |
Special Stitches Explained
- Front Post Double Crochet (fptr): Yarn over, insert hook from front to back to front around the post of the specified stitch two rows below, yarn over, pull up a loop, [yarn over, pull through 2 loops] twice.
Pattern Instructions
Section 1: The Main Bow Body
Working flat in rows.
Row 1: Ch 12, working in back bumps of ch, sc in 2nd ch from hook and in each ch across, turn. (11 sc)
Row 2: Ch 1 (does not count as st here and throughout), sc in first st, hdc in next 9 sts, sc in last st, turn. (1 sc, 9 hdc, 1 sc)
Rows 3–6: Rep Row 2 four more times. (1 sc, 9 hdc, 1 sc each row)
Row 7: Ch 1, sc in each st across. (11 sc)
Fasten off, leaving a long 12-inch tail for seaming the short ends together.
✅ Checkpoint: Fold your rectangular panel in half matching the short ends together. Seam the short edges using the mattress stitch to form a seamless loop. Fasten off and weave in ends.
Section 2: Ribbon Tails (Make 2)
Working flat from the top down.
Row 1: Ch 5, sc in 2nd ch from hook and in each ch across, turn. (4 sc)
Row 2: Ch 1, 2 sc in first st, sc in next 2 sts, 2 sc in last st, turn. (6 sc)
Rows 3–7: Ch 1, sc in each st across, turn. (6 sc)
Row 8 (Shape Tip): Ch 1, sk first st, sc in next 4 sts, sk last st, turn. (4 sc)
Rows 9–10: Ch 1, sc in each st across, turn. (4 sc)
Row 11: Ch 1, sk first st, sc in next 2 sts, sk last st, turn. (2 sc)
Row 12: Ch 1, sc in each st across, turn. (2 sc)
Row 13: Sk first st, sl st in last st. (1 st)
Fasten off, leaving a 6-inch tail for assembly.
Section 3: Center Cinch Band
Row 1: Ch 4, sc in 2nd ch from hook and across, turn. (3 sc)
Rows 2–3: Ch 1, sc in each st across, turn. (3 sc)
Fasten off, leaving a long 10-inch tail.
Section 4: Assembly & Finishing
- Prepare the Bow: Take your looped Bow Body from Section 1. Pinch the center seam inward so it resembles an hourglass or butterfly bow shape.
- Attach the Tails: Place the top straight edges of the two Ribbon Tails behind the pinched center of the bow.
- Wrap the Band: Wrap the Center Cinch Band tightly around the center pinch of the bow and the top edges of the ribbon tails. Whipstitch the short ends of the band together tightly on the back side using your tapestry needle.
- Attach Hardware: Securely anchor the golden swivel lobster clasp to the back wrap of the center band using reinforced whip stitches with matching velvet yarn. Weave in all remaining loose ends securely.
💡 Designer Tip: Add a tiny dab of fabric glue to the knot knots on the back of your velvet wrap to ensure they never slip loose when clipped to a busy bag zipper.
Size Customization Tips
- To Make a Smaller Bow: Start Section 1 with a chain of 8 instead of 12, and work 4 rows instead of 6. This reduces the overall width by approximately 1.5 inches (3.8 cm), creating a dainty charm ideal for wristlets or wallets.
- To Make a Larger Statement Bow: Start Section 1 with a chain of 16 and work 10 rows. This yields a bolder, oversized bow measuring roughly 7.5 inches (19 cm) across, perfect for large weekend totes.
Care Instructions
- Hand wash gently in cool water with mild detergent.
- Do not wring or twist the chenille velvet yarn.
- Gently press out excess water with a clean towel and lay flat to dry completely on a flat surface.
- Do not iron or dry clean.
Delicate Velvet Ribbon Bag Charm Free Bag Pattern
Thank you so much for stitching along with me today! I hope you love styling your new velvet charm on all your favorite bags. If you make one, please snap a photo, tag me on social media, save this project to your favorite Pinterest board, and leave a comment below to let me know which colorway you chose! Happy crocheting!