
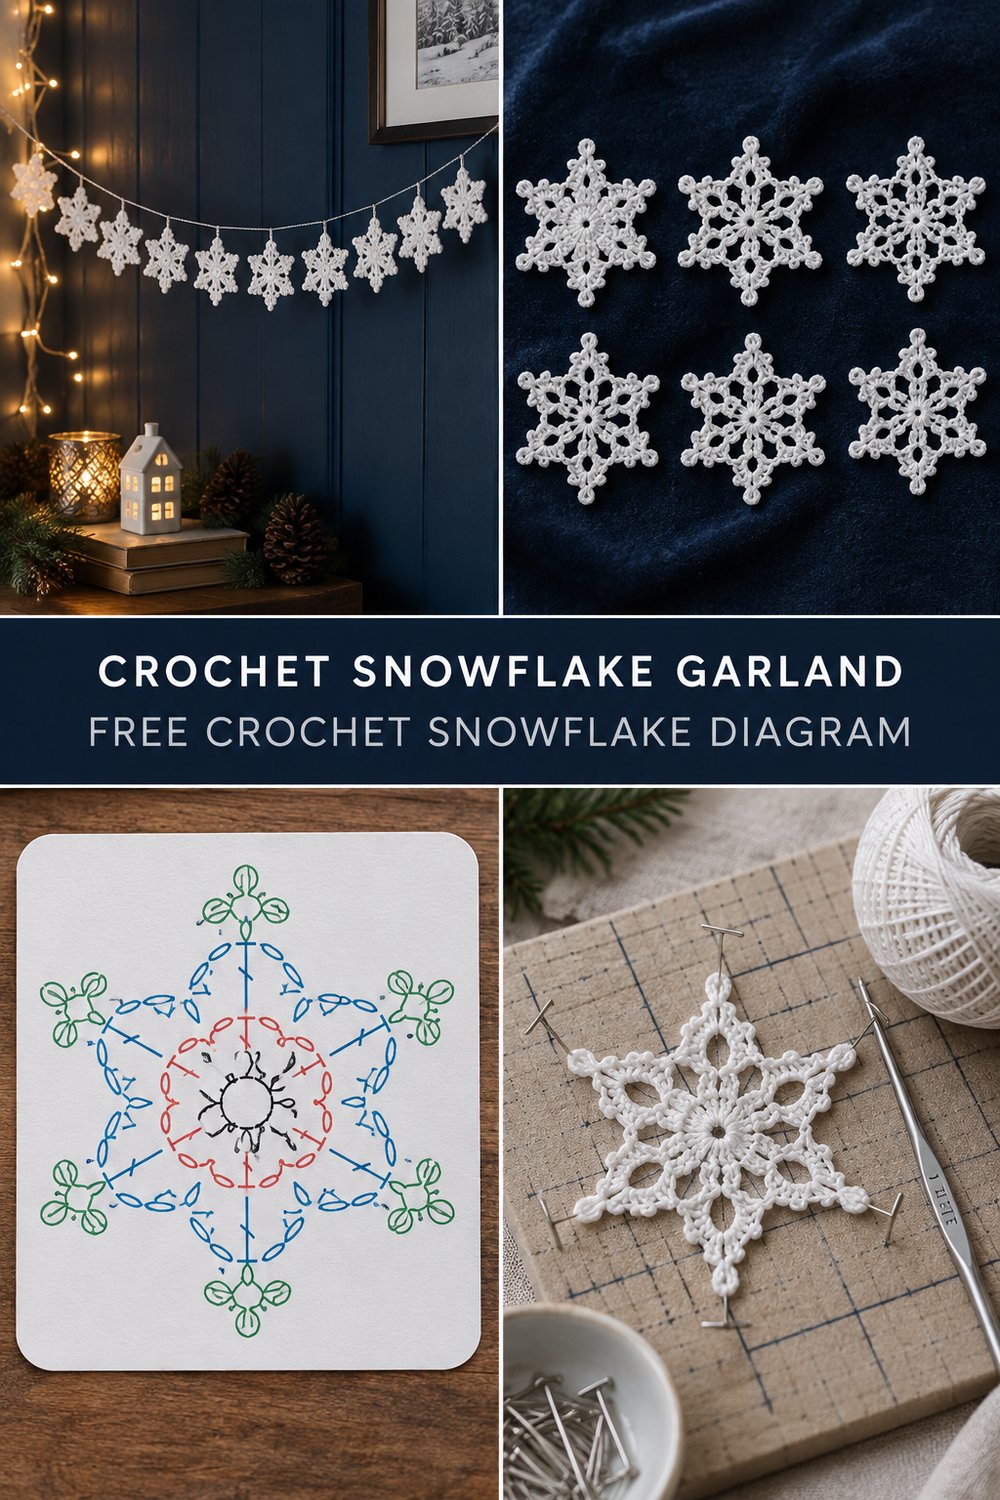
Embrace the quiet beauty of winter with a project that brings handcrafted charm to your home. This crochet snowflake garland offers a delicate sparkle, perfect for adorning your mantelpiece or adding a frosty touch to any room. Crafted with fine thread, these elegant snowflakes capture the essence of a serene winter wonderland.
Crochet Snowflake Garland Free Stitch Diagram
These delicate crochet snowflakes are made using basic chain, slip stitch, single crochet, double crochet, and treble crochet stitches, making them surprisingly accessible. Each snowflake measures approximately 2.5 inches (6.5 cm) in diameter, making them ideal for a snowflake garland or individual ornaments. You can create a garland of eleven snowflakes in about 6-8 hours, depending on your pace. They make wonderful handmade gifts and delightful additions to any Christmas crochet decor.
💡 Designer Tip: While this pattern uses fine thread for a delicate look, you’ll find tips later for adapting the size if you prefer a larger snowflake!
What Makes This Snowflake Garland Special
This crochet snowflake garland design stands out due to its exquisite detail and crisp definition. Each snowflake is six-pointed, a classic and elegant silhouette that evokes traditional winter imagery. The pattern incorporates picot tips on each point, adding a delicate, almost icy texture that catches the light beautifully. The design also features open chain loops within the snowflake structure, giving it an airy, lacelike quality. When blocked and starched, these elements combine to create a remarkably crisp and dimensional finished piece, perfect for crochet winter decor. The use of fine thread further enhances this delicate appearance, making each snowflake a tiny work of art.
Skill Level
This pattern is suitable for confident beginners and intermediate crocheters.
- Required Skills:
- Magic Ring/Adjustable Ring
- Slip Stitch (sl st)
- Chain (ch)
- Single Crochet (sc)
- Double Crochet (dc)
- Treble Crochet (tr)
- Picot Stitch (special stitch explained)
- Working in the round
- Following a stitch diagram (optional, but diagram is provided)
✅ Checkpoint: If you’re comfortable with basic stitches and working in the round, you have all the foundational skills needed for this easy crochet snowflake project!
Finished Measurements
Each snowflake measures:
| Measurement | Inches | Centimeters |
|---|---|---|
| Snowflake Diameter | 2.5 inches | 6.5 cm |
Materials You Will Need
To create your crochet snowflake garland, you will need:
| Material | Type/Weight | Yardage (approx.) |
|---|---|---|
| White Cotton Thread | Size 10 | 50 yards (46m) |
| Steel Crochet Hook | 1.75mm (US 5) | |
| Small sharp scissors | ||
| Yarn needle | ||
| Blocking board & pins | Rustproof | |
| Liquid fabric stiffener | e.g., Stiffy, Aleene’s Fabric Stiffener | |
| Silver thread or fishing line | For stringing | 6-8 feet (2-2.5m) |
Yarn Suggestions
For best results with this crochet snowflake pattern, choose mercerized cotton thread that holds its shape well after blocking and stiffening.
| Brand/Line | Weight | Yardage per Skein | Notes |
|---|---|---|---|
| Aunt Lydia’s Classic Crochet Thread | Size 10 | 400 yards | Widely available, excellent stitch definition. |
| Lizbeth Tatting and Crochet Thread | Size 20 | 120 yards | Finer thread for even more delicate snowflakes (adjust hook). |
| Omega La Espiga Crochet Thread | Size 10 | 315 yards | Smooth and lustrous, good for intricate work. |
⚠️ Note: Avoid using fuzzy or loosely plied yarns, as they will obscure the delicate stitch definition and picot tips, making your snowflakes less crisp and defined. Stick with mercerized cotton thread for the best results.
Gauge
Gauge is not critical for this decorative item, but for a finished snowflake of approximately 2.5 inches (6.5 cm), you should achieve the following:
| Measurement |
|---|
| Diameter of Rnd 3: 1 inch (2.5 cm) |
💡 Designer Tip: If your Rnd 3 is significantly larger or smaller, try adjusting your hook size up or down by one size (e.g., 2.0mm or 1.5mm) to match the intended delicate scale.
Abbreviations
| Abbreviation | Meaning |
|---|---|
| ch | Chain |
| dc | Double Crochet |
| Picot | Picot Stitch |
| Rnd | Round |
| sc | Single Crochet |
| sl st | Slip Stitch |
| st(s) | Stitch(es) |
| tr | Treble Crochet |
| yo | Yarn Over |
Special Stitches Explained
Picot Stitch (Picot): Ch 3, sl st into the 3rd ch from hook.
💡 Designer Tip: Make your picots consistently small and tight for a crisp, pointed effect on your snowflake tips.
Pattern Instructions
This pattern creates one crochet snowflake. Repeat these instructions for each snowflake you wish to add to your garland.
### Section 1: Snowflake Center
Start with an adjustable magic ring or ch 4 and sl st to first ch to form a ring.
Rnd 1: Ch 2 (counts as first dc), 11 dc into ring. Join with sl st to top of ch-2. Pull magic ring closed tightly. (12 dc)
Rnd 2: Ch 1, sc in first dc, ch 3; repeat from * around. Join with sl st to first sc. (12 sc, 12 ch-3 spaces)
✅ Checkpoint: You should have 12 distinct ch-3 loops forming the next layer of your snowflake.
### Section 2: Building the Points
Rnd 3: Sl st into first ch-3 space. Ch 1, (sc, ch 3, sc) in first ch-3 space, ch 3; repeat from * around. Join with sl st to first sc. (24 sc, 12 ch-3 spaces)
Rnd 4: Sl st into first ch-3 space. Ch 1, (sc, ch 5, sc) in first ch-3 space, ch 3; repeat from * around. Join with sl st to first sc. (24 sc, 12 ch-5 spaces, 12 ch-3 spaces)
### Section 3: Creating the Six Points
Rnd 5: Sl st into first ch-5 space. Ch 1, (sc, ch 3, dc, ch 3, sc) in first ch-5 space, ch 3, skip next ch-3 space; repeat from * around. Join with sl st to first sc. (18 sc, 6 dc, 12 ch-3 spaces, 6 ch-3 skipped spaces)
✅ Checkpoint: You should now clearly see six distinct “petals” or nascent points forming.
Rnd 6: Sl st into first ch-3 space of a “petal”. Ch 1, sc in ch-3 space, ch 3, (dc, ch 3, dc) in next dc, ch 3, sc in next ch-3 space, ch 3, skip next ch-3 space; repeat from * around. Join with sl st to first sc. (12 sc, 12 dc, 24 ch-3 spaces)
### Section 4: Finalizing the Points with Picots
Rnd 7: Sl st into first ch-3 space. Ch 1, sc in ch-3 space, ch 3, dc in next dc, ch 3, (tr, Picot, tr) in next ch-3 space, ch 3, dc in next dc, ch 3, sc in next ch-3 space, ch 3, skip next ch-3 space; repeat from * around. Join with sl st to first sc. (12 sc, 12 dc, 12 tr, 6 Picots, 30 ch-3 spaces)
Fasten off and weave in all ends securely. Repeat for each snowflake.
### Section 5: Assembly
- Block and Stiffen: Gently wet each snowflake. Place on a blocking board, stretching each point evenly and pinning them down with rustproof pins. Apply liquid fabric stiffener generously, ensuring it saturates the thread. Allow to dry completely (this may take several hours or overnight).
- Stringing the Garland: Once dry and stiff, unpin your snowflakes. Cut a length of silver thread or fishing line. Using a yarn needle, carefully thread the silver line through one of the top chain loops or a picot point of each snowflake. Space them evenly along the garland, perhaps 3-4 inches (7.5-10 cm) apart, and tie a small knot on either side of each snowflake to hold its position. Leave extra length at each end for hanging.
💡 Designer Tip: For extra sparkle, you can add tiny silver beads between the snowflakes on the garland string.
Size Customization Tips
This pattern is designed for a delicate 2.5 inch (6.5 cm) snowflake using size 10 thread and a 1.75mm hook.
- For a larger snowflake: Use a thicker thread (e.g., size 3 crochet thread or even a fine fingering weight yarn) and a larger hook (e.g., 2.0mm – 2.75mm, depending on yarn). This will result in snowflakes approximately 3.5-4.5 inches (9-11.5 cm) in diameter.
- For an even smaller, more delicate snowflake: Use a finer thread (e.g., size 20 or 30 crochet thread) and a smaller steel hook (e.g., 1.5mm or 1.25mm). This will create snowflakes approximately 1.5-2 inches (4-5 cm) in diameter.
⚠️ Note: Always swatch first when changing yarn or hook size to ensure you achieve the desired fabric and scale.
Care Instructions
To maintain the crispness and shape of your crochet snowflakes:
- Spot clean only: Use a damp cloth with mild soap for any smudges.
- Do not machine wash: This will likely remove the stiffening and distort the shape.
- If they lose their shape: You can gently re-wet, block, and re-stiffen them.
- Store flat: To prevent bending or crushing, store your garland flat in a box when not in use.
Crochet Snowflake Garland Free Stitch Diagram
I hope you enjoyed creating this beautiful crochet snowflake garland! These delicate snowflakes add such a touch of elegance to any holiday or winter decor. I love seeing your creations, so please share your finished garlands on social media and tag me or use #CrochetSnowflakeGarland. Don’t forget to save this free crochet snowflake diagram to your Pinterest board for future reference, and leave a comment below with your thoughts or any questions! Happy Crocheting!