
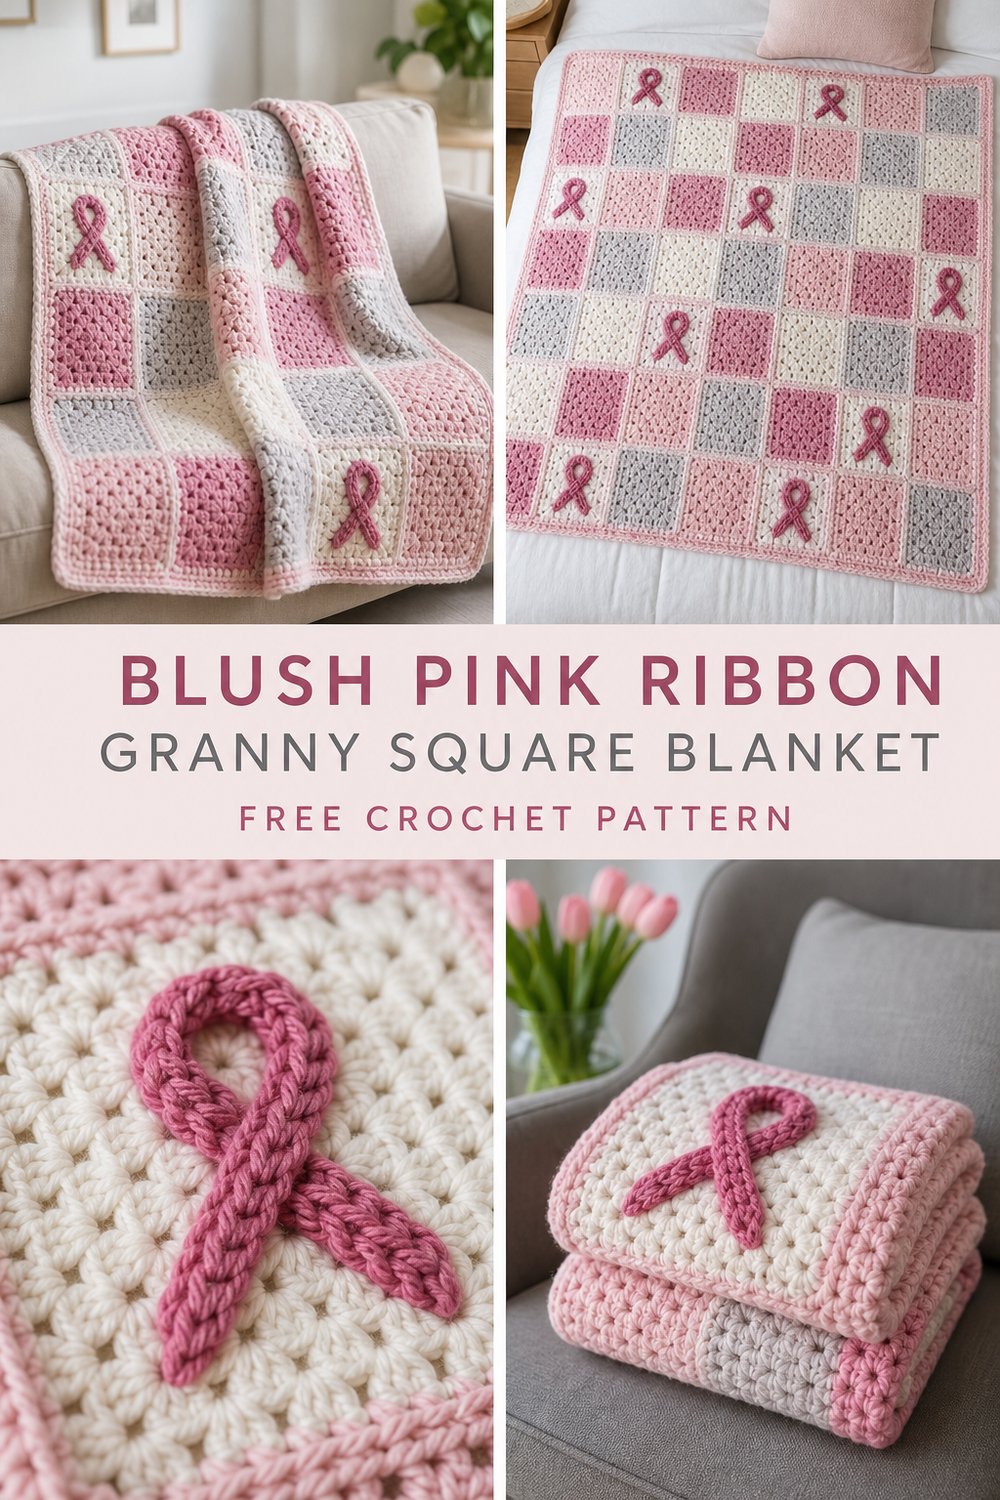
Wrap yourself in the comforting embrace of soft cotton textures and delicate raised motifs, perfect for styling over a linen sofa or spreading across a sunlit bed. This heirloom-quality throw invites you to slow down and enjoy the meditative rhythm of traditional motif crochet combined with elevated dimensional detailing.
Blush Pink Ribbon Granny Square Blanket Free Crochet Pattern
Quick Facts
- Stitches Used: ch, sl st, sc, hdc, dc, tr, fpdc, 5-dc puff st, shell st
- Size Fit: Standard throw blanket (approx. 50″ x 60″ / 127 cm x 152 cm)
- Estimated Hours to Complete: 35–45 hours
- Gift-Appeal: An exquisite, heartfelt handmade gift for weddings, housewarmings, or nursery keepsakes that will be treasured for generations.
Sizing customization tips are included later in the pattern to help you easily adjust your blanket for larger beds or smaller lap throws.
What Makes This Blush Pink Ribbon Granny Square Blanket Special
This design elevates the classic granny square by integrating dimensional floral and ribbon motifs every few squares. Using front-post stitches and plush puff stitches, the magenta ribbon loops pop vividly off the smooth cream shell-stitch bodies. Joined seamlessly with a clean border, the interplay of blush pink, dusty rose, cream white, and pale grey creates a sophisticated, modern-vintage aesthetic that looks stunning in any living space.
Skill Level
- Intermediate
- Advanced beginner confident with motif joining and front-post work
- Required Skills: Working in the round, front-post crochet, puff stitches, basic granny square construction, and joining-as-you-go or mattress stitch.
💡 Designer Tip: Take your time practicing the front-post ribbon loops on a swatch before diving into the main squares to ensure consistent tension.
Finished Measurements
| Dimension | Inches | Centimeters |
|---|---|---|
| Width | 50 inches | 127 cm |
| Length | 60 inches | 152 cm |
| Single Square Size | 5 inches | 12.7 cm |
Materials You Will Need
- Yarn: Worsted weight (Category 4) soft cotton yarn
- Hook: US H/8 (5.0 mm) crochet hook
- Notions: Tapestry needle for weaving in ends, locking stitch markers, sharp scissors
| Colorway | Exact Shade Order | Yardage Needed |
|---|---|---|
| Color A | Blush Pink | 900 yds (823 m) |
| Color B | Dusty Rose | 750 yds (686 m) |
| Color C | Cream White | 1,200 yds (1,097 m) |
| Color D | Pale Grey | 650 yds (594 m) |
| Color E | Magenta (Ribbon Motifs) | 300 yds (274 m) |
Yarn Suggestions
| Yarn Brand & Line | Weight | Skein Yardage | Notes |
|---|---|---|---|
| Lion Brand Rewind | Worsted / #4 | 219 yds per 100g | Beautiful matte tape structure, wonderful drape. |
| Bernat Maker Home Dec | Bulky/Heavy Worsted | 290 yds per 250g | Exceptional softness, though check gauge carefully. |
| Knit Picks Dishie | Worsted / #4 | 190 yds per 100g | 100% cotton, crisp stitch definition, excellent color range. |
⚠️ Note: Avoid slippery synthetic acrylic yarns that lack stitch definition; 100% cotton or cotton-blend yarns are strongly recommended to showcase the crisp ribbon and shell textures.
Gauge
- One standard motif square measures exactly 5 inches x 5 inches (12.7 cm x 12.7 cm) after blocking.
- Gauge Swatch Requirement: Work one standard granny square through Round 5. Measure carefully. If your square is too large, drop down a hook size. If it is too small, go up a hook size.
| Measurement Type | Stitches / Rows | Imperial | Metric |
|---|---|---|---|
| Motif Gauge | 1 full square | 5 in x 5 in | 12.7 cm x 12.7 cm |
| Stitch Gauge | 16 sts x 9 rows (dc) | 4 in x 4 in | 10 cm x 10 cm |
Abbreviations
| Abbreviation | Full Meaning |
|---|---|
| ch | chain |
| sl st | slip stitch |
| sc | single crochet |
| hdc | half double crochet |
| dc | double crochet |
| tr | treble crochet |
| fpdc | front-post double crochet |
| puff | 5-dc puff stitch |
| st(s) | stitch(es) |
| sp(s) | space(s) |
| rep | repeat |
| RS | right side |
Special Stitches Explained
- 5-dc Puff Stitch (puff): Yo, insert hook in indicated st/sp, yo and pull up a loop (3 loops on hook). [Yo, insert hook in same st/sp, yo and pull up a loop] 4 times (9 loops on hook). Yo and draw through all 9 loops on hook, ch 1 to secure.
- Front-Post Double Crochet (fpdc): Yo, insert hook from front to back to front around the post of the specified st from the previous round, yo and pull up a loop, [yo and draw through 2 loops] twice.
- Ribbon Loop Motif Center: Formed by working alternating rounds of foundational cream shell stitches framed by raised magenta fpdc framing loops that mimic folded ribbon tails.
Pattern Instructions
Section 1: Standard Granny Squares (Make 120 Total)
Make 35 in Color A, 30 in Color B, 35 in Color C, and 20 in Color D.
- Round 1 (RS): Starting with center ring, ch 4, sl st to first ch to form ring. Ch 3 (counts as 1 dc here and throughout), work 2 dc in ring, ch 2, [3 dc in ring, ch 2] 3 times; join with sl st to top of beg ch-3. (12 dc, 4 ch-2 sps)
- Round 2: Sl st in next 2 dc and into ch-2 sp. Ch 3, (2 dc, ch 2, 3 dc) in same ch-2 sp, ch 1, skip 3 dc, (3 dc, ch 2, 3 dc) in next ch-2 sp; rep from * around, ch 1, join with sl st to top of beg ch-3. (24 dc, 4 ch-1 sps, 4 ch-2 sps)*
- Round 3: Sl st in next 2 dc and into ch-2 sp. Ch 3, (2 dc, ch 2, 3 dc) in same ch-2 sp, ch 1, 3 dc in next ch-1 sp, ch 1, (3 dc, ch 2, 3 dc) in next ch-2 sp; rep from * around, ending with ch 1, join with sl st to top of beg ch-3. (36 dc, 8 ch-1 sps, 4 ch-2 sps)*
- Round 4: Sl st in next 2 dc and into ch-2 sp. Ch 3, (2 dc, ch 2, 3 dc) in same ch-2 sp, ch 1, [3 dc in next ch-1 sp, ch 1] twice, (3 dc, ch 2, 3 dc) in next ch-2 sp; rep from * around, ending with ch 1, join with sl st to top of beg ch-3. (48 dc, 12 ch-1 sps, 4 ch-2 sps)*
- Round 5: Sl st in next 2 dc and into ch-2 sp. Ch 1, work 3 sc in same ch-2 sp, sc in each dc and ch-1 sp across to next corner ch-2 sp, 3 sc in corner ch-2 sp; rep from * around, join with sl st to first sc. Fasten off, leaving a 6-inch tail for weaving. (76 sc)*
✅ Checkpoint: Each standard square should measure 5 inches across and have exactly 19 sc stitches per side.
Section 2: Ribbon Motif Squares (Make 24 Total)
Working base with Color C, incorporating Color E (Magenta) on Round 3.
- Round 1 (RS): With Color C, ch 4, sl st to first ch to form ring. Ch 3, work 2 dc in ring, ch 2, [3 dc in ring, ch 2] 3 times; join with sl st to top of beg ch-3. (12 dc, 4 ch-2 sps)
- Round 2: Sl st in next 2 dc and into ch-2 sp. Ch 3, (1 dc, ch 2, 2 dc) in same ch-2 sp, ch 1, skip 3 dc, (2 dc, ch 2, 2 dc) in next ch-2 sp; rep from * around, join with sl st to top of beg ch-3. Fasten off Color C. (16 dc, 4 ch-1 sps, 4 ch-2 sps)*
- Round 3: Join Color E (Magenta) in any corner ch-2 sp. Ch 3, (1 dc, ch 2, 2 dc) in same sp, ch 1, work 1 fpdc around each of the next 2 dc, work 1 puff st in ch-1 sp, work 1 fpdc around next 2 dc, ch 1, (2 dc, ch 2, 2 dc) in corner ch-2 sp; rep from * around, join with sl st to top of beg ch-3. Fasten off Color E. (16 dc, 8 fpdc, 4 puff sts, 4 ch-2 sps)*
- Round 4: Join Color C in any corner ch-2 sp. Ch 3, (2 dc, ch 2, 3 dc) in same ch-2 sp, ch 1, skip next sts, 3 dc in ch-1 sp, ch 1, skip next sts, (3 dc, ch 2, 3 dc) in corner ch-2 sp; rep from * around, join with sl st to top of beg ch-3. (48 dc, 8 ch-1 sps, 4 ch-2 sps)*
- Round 5: Sl st in next 2 dc and into ch-2 sp. Ch 1, work 3 sc in same ch-2 sp, sc in each dc and ch-1 sp across to next corner ch-2 sp, 3 sc in corner ch-2 sp; rep from * around, join with sl st to first sc. Fasten off. (76 sc)*
✅ Checkpoint: Verify that all 24 ribbon squares feature raised magenta puff-and-post loops centered neatly on each side before moving on to assembly.
Section 3: Layout and Assembly
- Grid Configuration: Arrange your finished squares in a grid pattern measuring 10 squares wide by 14 squares high (140 total squares: 120 standard squares and 24 ribbon squares spaced evenly on every fifth square placement as shown in the product styling).
- Joining Method: With RS facing and using Color C, join squares using either the flat braid join or a whipstitch through the back loops only. Work all vertical strips first, then horizontal connecting seams.
- Weaving Ends: Weave in all loose yarn ends securely using your tapestry needle.
Section 4: Border
- Round 1: Join Color A to any corner stitch of the blanket. Ch 1, work 3 sc in corner st, evenly sc down the side of the blanket, working 3 sc in each corner st around the entire perimeter. Join with sl st to first sc.
- Round 2: Ch 3 (counts as 1 dc), dc in each sc around, working (2 dc, ch 2, 2 dc) in each corner st. Join with sl st to top of beg ch-3.
- Round 3: Ch 1, working in reverse sc (crab stitch) all the way around the border for a polished, textured corded edge. Fasten off and weave in final ends.
Size Customization Tips
- Adjusting Width: Add or subtract columns of 5-inch squares. Each full square column added increases the total blanket width by 5 inches (12.7 cm).
- Adjusting Length: Add or subtract rows of squares. Each row added increases the blanket length by 5 inches (12.7 cm). Be sure to adjust your yarn yardage calculations accordingly if making the blanket larger.
Care Instructions
- Hand wash gently in cool water with mild wool wash.
- Do not bleach or wring out.
- Lay flat on a clean towel to block to final dimensions.
- Reshape gently while damp.
- Do not iron directly; use cool steam setting if needed.
Closing
Thank you so much for crafting along with the Blush Pink Ribbon Granny Square Blanket Free Crochet Pattern! I hope you adore working on every single stitch as much as I did designing it. Please share your finished blankets on social media by tagging me and using the hashtag #BlushRibbonBlanket so I can admire your gorgeous color combinations. Don’t forget to save this pattern to your Pinterest boards for your next cozy project, and leave a comment below if you have any questions! Happy crocheting!