
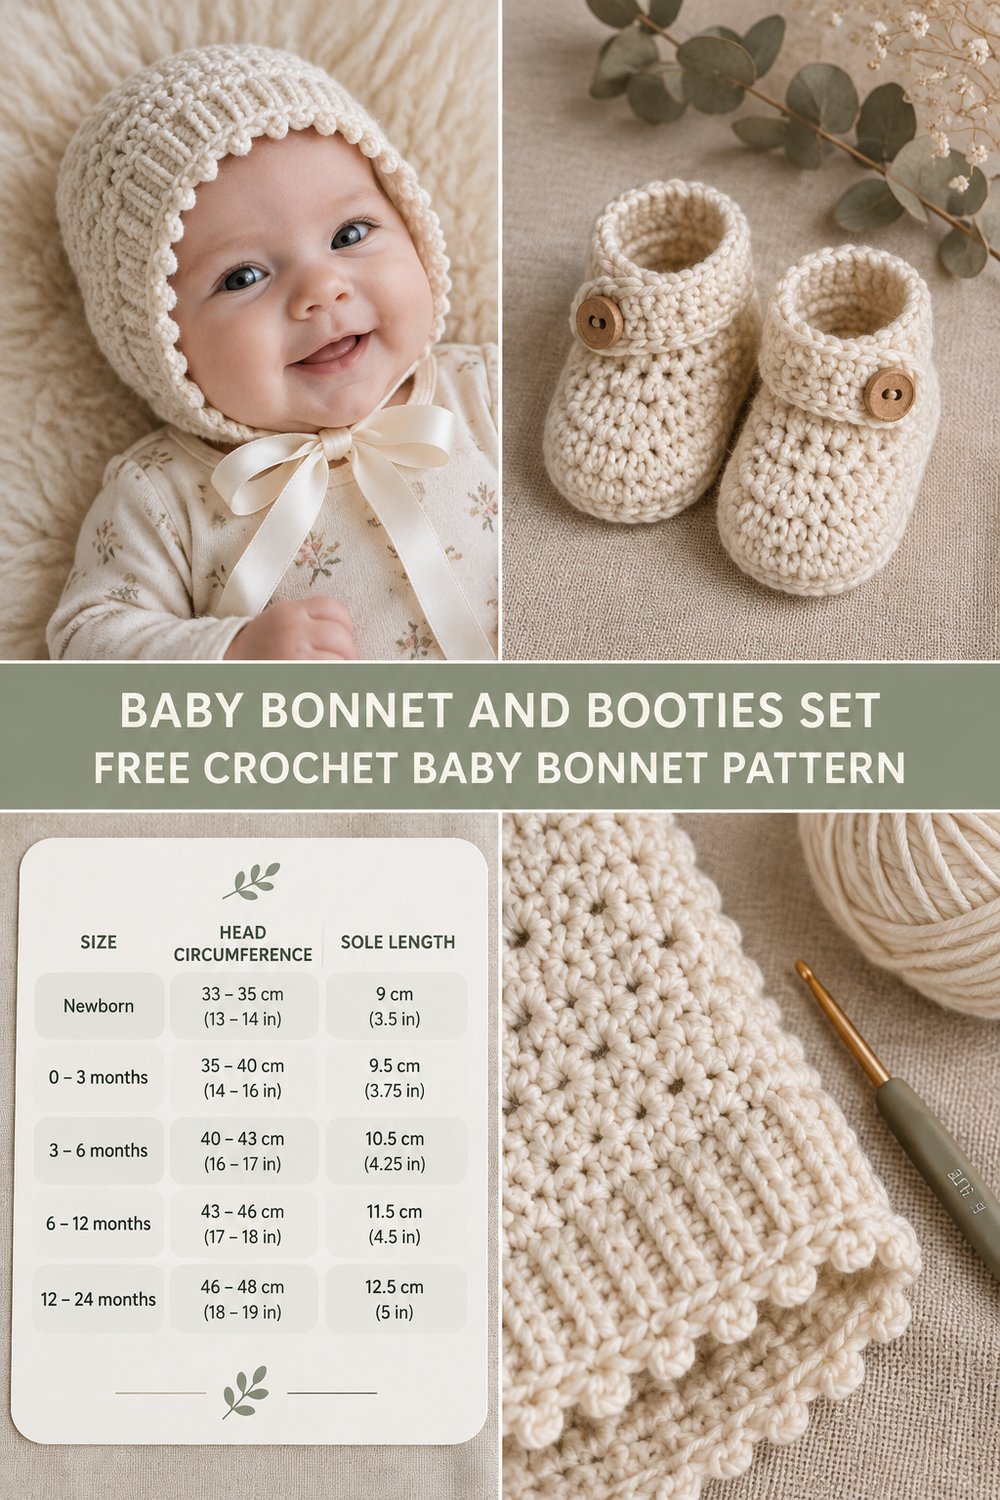
Wrap your little one in handcrafted warmth with this adorable Baby Winter Bonnet & Booties Set. Imagine soft merino-cotton gently caressing delicate skin, offering comfort and style in every stitch. This versatile set is perfect for capturing those precious early memories or gifting a truly special, handmade keepsake.
Baby Winter Bonnet & Booties Set Free Size Guide
Crafted with love, this crochet baby bonnet and matching crochet baby booties set features simple stitches for a beautiful texture. Designed to fit newborns up to 24 months, it’s a perfect crochet baby gift that can be completed in approximately 4-6 hours. It’s an ideal project for creating treasured heirlooms.
You’ll find detailed crochet size guide tips later to customize your set perfectly.
What Makes This Baby Winter Bonnet & Booties Set Special
This baby winter crochet set stands out for its blend of classic charm and practical design. The bonnet features a beautifully textured ribbed brim created with back loop only single crochet (blo sc), providing a snug yet comfortable fit. The main body of the bonnet uses simple half double crochet (hdc) for a soft, dense fabric, finished with a delicate picot edge for a touch of elegance. Satin ties add a luxurious and functional element. The matching booties are constructed from the sole up, using increases for a natural foot shape, and feature a coordinating ribbed cuff and adorable wooden button straps for easy wear and removal. The combination of plush merino-cotton yarn and these thoughtful details creates an authentic, tactile piece that’s both visually appealing and incredibly soft against a baby’s skin.
Skill Level
This pattern is designed for adventurous beginners and intermediate crocheters.
- Ability to read a crochet pattern
- Familiarity with basic stitches: chain (ch), slip stitch (sl st), single crochet (sc), half double crochet (hdc), double crochet (dc)
- Experience with working in rounds and rows
- Comfort with increasing and decreasing stitches
- Knowledge of working in back loops only (blo)
- Confidence in sewing components together and attaching buttons
If you’re comfortable with these techniques, you’ll find this project a delightful and rewarding experience.
Finished Measurements
| Size | Head Circumference (in) | Head Circumference (cm) | Bootie Sole Length (in) | Bootie Sole Length (cm) |
|---|---|---|---|---|
| Newborn | 13-14 | 33-35.5 | 3.25 | 8.25 |
| 0-3 Months | 14-15 | 35.5-38 | 3.75 | 9.5 |
| 3-6 Months | 15-17 | 38-43 | 4.25 | 10.75 |
| 6-12 Months | 17-18 | 43-45.5 | 4.5 | 11.5 |
| 12-24 Months | 18-19 | 45.5-48 | 5 | 12.75 |
Materials You Will Need
| Item | Color | Yardage (approx.) |
|---|---|---|
| DK (light worsted) yarn | Cream | 250-350 yards |
| 3.5mm (E/4) crochet hook | ||
| Stitch markers | ||
| Yarn needle | ||
| Scissors | ||
| Measuring tape | ||
| 2 small wooden buttons (approx. 10-12mm) | ||
| 1 yard (approx. 0.9m) of 1/4″ (6mm) satin ribbon | Cream |
Yarn Suggestions
To achieve the plush, soft texture seen in the image, I highly recommend a high-quality merino-cotton blend in a DK weight.
| Yarn Brand/Line | Weight | Yardage per Skein | Notes |
|---|---|---|---|
| Lion Brand Comfy Cotton Blend | DK | 218 yards | Soft, durable, excellent stitch definition. |
| Paintbox Yarns Cotton DK | DK | 137 yards | Wide range of colors, affordable, 100% cotton. |
| Debbie Bliss Baby Cashmerino | DK | 137 yards | Luxurious merino, cashmere, and microfiber blend. Super soft! |
⚠️ Note: Avoid synthetic acrylic yarns that feel stiff or overly slick. While more affordable, they may not provide the desired softness or drape crucial for baby items, and can sometimes cause irritation to sensitive skin.
Gauge
| Stitch/Row | Over 4 inches (10 cm) |
|---|---|
| hdc | 16 stitches |
| hdc | 12 rows |
💡 Designer Tip: Always make a gauge swatch! Crocheting to the correct gauge ensures your finished item will match the pattern’s intended size, especially important for baby items. If your swatch is too small, go up a hook size; if it’s too large, go down a hook size.
Abbreviations
| Abbreviation | Meaning |
|---|---|
| ch | Chain |
| sl st | Slip stitch |
| sc | Single crochet |
| hdc | Half double crochet |
| dc | Double crochet |
| blo | Back loop only |
| st(s) | Stitch(es) |
| R | Round/Row |
| inc | Increase (2 sts in same st) |
| dec | Decrease (sc2tog or hdc2tog) |
| sp | Space |
| picot | Special stitch (see below) |
| sk | Skip |
| fo | Fasten off |
Special Stitches Explained
Picot (bonnet edging): Ch 3, sl st into the 3rd ch from hook, then sl st into the same stitch where the picot was started.
hdc2tog (half double crochet 2 together): Yo, insert hook into first st, yo and pull up a loop (3 loops on hook). Yo, insert hook into next st, yo and pull up a loop (5 loops on hook). Yo and pull through all 5 loops on hook.
Pattern Instructions
Section 1: Baby Bonnet
The bonnet is worked from the crown down, with a ribbed brim added last.
Crown (Working in Rounds):
- Create a magic ring. Ch 2 (does not count as st here and throughout). Work 10 hdc into the ring. Join with sl st to first hdc. (10 hdc)
- Ch 2. 2 hdc in each st around. Join with sl st to first hdc. (20 hdc)
- Ch 2. 1 hdc in first st, 2 hdc in next st around. Join with sl st to first hdc. (30 hdc)
- Ch 2. 1 hdc in first 2 sts, 2 hdc in next st around. Join with sl st to first hdc. (40 hdc)
- Ch 2. 1 hdc in first 3 sts, 2 hdc in next st around. Join with sl st to first hdc. (50 hdc)
✅ Checkpoint: At the end of R5, your flat circle should measure approximately 3 inches (7.5 cm) in diameter for Newborn size. Adjust if needed.
Bonnet Body (Working in Rows for the back of the head):
💡 Designer Tip: The number of rows for the bonnet body determines the depth of the bonnet. Adjust this section to achieve your desired fit.
- (This row establishes the opening for the face). Ch 2. 1 hdc in each of the first 35 sts. Turn. Leave remaining 15 sts unworked. (35 hdc)
- Ch 2. 1 hdc in each st across. Turn. (35 hdc)
- Repeat R7 for 10 (Newborn), 12 (0-3M), 14 (3-6M), 16 (6-12M), 18 (12-24M) more rows, or until the panel measures approximately 4.5 (Newborn), 5.5 (0-3M), 6.5 (3-6M), 7.5 (6-12M), 8.5 (12-24M) inches from R6.
- For Newborn: 11 rows total from R6. (35 hdc)
- For 0-3 Months: 13 rows total from R6. (35 hdc)
- For 3-6 Months: 15 rows total from R6. (35 hdc)
- For 6-12 Months: 17 rows total from R6. (35 hdc)
- For 12-24 Months: 19 rows total from R6. (35 hdc)
Do NOT fasten off.
Ribbed Brim:
- Ch 7. Sc in 2nd ch from hook and in next 5 chs. (6 sc). Sl st into the first hdc of the last row of the bonnet body. (6 sc)
- Sl st into the next hdc of the bonnet body. Turn.
- Sc in blo of each of the 6 sc. Turn. (6 sc)
- Ch 1. Sc in blo of each of the 6 sc. Sl st into the next 2 hdc of the bonnet body. Turn. (6 sc)
- Repeat R3 and R4 around the entire opening of the bonnet, always slip stitching into the bonnet body, and ensuring the brim is attached evenly. You will work down the side of the hdc rows, then across the unworked stitches of R5, then up the other side of the hdc rows. When you reach the end, sl st the first and last rows of the brim together to form a seamless circle. Fo and weave in ends.
✅ Checkpoint: The ribbed brim should now be securely attached around the entire face opening of the bonnet, creating a snug edge.
Picot Edging:
- Join yarn with a sl st to the bottom corner of the back edge of the bonnet (where the ribbed brim ends). Ch 1.
- Sc evenly around the entire back edge of the bonnet (the part that cups the back of the head, not the face opening), placing approximately 1 sc per row/stitch. Join with sl st to first sc.
- Ch 1. Sc in next st, Picot, sk 1 st around. Join with sl st to first sc. Fo. Weave in ends.
Ties:
- Cut two 18-inch (45 cm) lengths of satin ribbon.
- Using a yarn needle, thread one end of a ribbon through the bottom corner of the brim on one side of the bonnet. Weave it through a few stitches for security, then tie a small knot to secure it. Repeat for the other side.
Section 2: Baby Booties (Make 2)
Sole (Working in Rounds):
- Ch 10.
- R1: Hdc in 3rd ch from hook, hdc in next 6 chs, 5 hdc in last ch. Working down the other side of the chain: hdc in next 6 chs, 3 hdc in last ch. Join with sl st to first hdc. (21 hdc)
- R2: Ch 2. 2 hdc in first hdc, hdc in next 6 hdc, 2 hdc in next 5 hdc, hdc in next 6 hdc, 2 hdc in next 3 hdc. Join with sl st to first hdc. (32 hdc)
- R3: Ch 2. Hdc in first st, 2 hdc in next st, hdc in next 6 hdc, hdc in next st, 2 hdc in next st 5 times, hdc in next 6 hdc, hdc in next st, 2 hdc in next st 3 times. Join with sl st to first hdc. (43 hdc)
- R4: Ch 1. Sc in blo of each st around. Join with sl st to first sc. (43 sc)
✅ Checkpoint: Your sole should now have a distinct oval shape. For a newborn bootie, it should measure approximately 3.25 inches (8.25 cm) long.
Bootie Body (Working in Rounds):
- R5: Ch 2. Hdc in each st around. Join with sl st to first hdc. (43 hdc)
- R6-R8: Repeat R5. (43 hdc per round)
- R9: Ch 2. Hdc in first 10 sts. (Hdc2tog) 8 times. Hdc in next 17 sts. Join with sl st to first hdc. (35 hdc)
- R10: Ch 2. Hdc in first 9 sts. (Hdc2tog) 6 times. Hdc in next 14 sts. Join with sl st to first hdc. (29 hdc)
- R11: Ch 2. Hdc in first 8 sts. (Hdc2tog) 4 times. Hdc in next 13 sts. Join with sl st to first hdc. (25 hdc)
Ribbed Cuff (Working in Rows, then joined):
- R12: Ch 1. Sc in blo of first 6 sts. Turn. (6 sc)
- R13: Ch 1. Sc in blo of each of the 6 sc. Turn. (6 sc)
- Repeat R13 until the ribbed strip, when stretched slightly, reaches halfway around the bootie opening. Sl st into the side of the bootie opening as you work, every few rows, to ensure it’s attached.
- When the strip reaches the center front of the bootie, fo. Weave in ends.
- Repeat steps 1-4 for the other half of the cuff. Join the two halves by sl st along the seam for a neat finish.
Strap:
- Ch 15. Sc in 2nd ch from hook and in next 13 chs. (14 sc)
- Ch 1, turn. Sc in first 10 sc, ch 2 (buttonhole), sk 2 sc, sc in last 2 sc. (12 sc, 1 ch-2 sp)
- Ch 1, turn. Sc in first 2 sc, 2 sc in ch-2 sp, sc in last 10 sc. (14 sc)
- Fo, leaving a long tail for sewing.
Assembly:
- Position the strap across the ankle of the bootie, with the buttonhole end on the outside of the bootie.
- Using the yarn needle, sew the non-buttonhole end of the strap securely to the inside of the bootie on one side.
- Sew a small wooden button to the outer side of the bootie, aligning it with the buttonhole.
- Repeat for the second bootie.
Checkpoint
- Have you woven in all your ends for both the bonnet and booties?
- Are the ribbon ties securely attached to the bonnet?
- Are the buttons sewn firmly to the booties?
Size Customization Tips
This pattern is designed to be highly customizable. Here’s how to adjust for different sizes:
- For a larger Bonnet:
- Crown: Continue increasing rounds in the crown (e.g., R6: 1 hdc in first 4 sts, 2 hdc in next st around) until the flat circle reaches the desired head circumference measurement divided by pi (approx. 3.14).
- Body Depth: Add more rows to the bonnet body section (R7 repeats) for a deeper bonnet. Each additional row adds approximately 0.75 inches (1.9 cm) to the depth.
- Brim Length: Increase the starting chain for the ribbed brim (e.g., ch 9 instead of ch 7) to make a wider brim.
- For a smaller Bonnet:
- Crown: Work fewer increase rounds for the crown.
- Body Depth: Work fewer rows in the bonnet body section. Each row removed reduces the depth by about 0.75 inches (1.9 cm).
- Brim Length: Decrease the starting chain for the ribbed brim (e.g., ch 5 instead of ch 7) for a narrower brim.
- For larger Booties:
- Sole Length: Start with a longer initial chain in R1 of the sole. Each additional chain stitch will add approximately 0.25 inches (0.6 cm) to the sole length.
- Sole Width: Add more increase rounds to the sole, maintaining the established increase pattern.
- Body Height: Add more plain hdc rounds (like R5) before starting the decreases for a taller bootie. Each additional round adds approximately 0.75 inches (1.9 cm) to the height.
- For smaller Booties:
- Sole Length: Start with a shorter initial chain in R1 of the sole. Each chain stitch removed will reduce the sole length by approximately 0.25 inches (0.6 cm).
- Sole Width: Remove increase rounds from the sole, maintaining the established increase pattern.
- Body Height: Remove plain hdc rounds (like R5) or start decreases earlier for a shorter bootie. Each round removed reduces the height by about 0.75 inches (1.9 cm).
💡 Designer Tip: Always refer back to the Finished Measurements table when customizing. Measure your work frequently against a measuring tape or even an existing baby item of the desired size.
Care Instructions
To keep your crochet baby bonnet and crochet baby booties looking their best:
- Hand wash gently in cool water with a mild detergent.
- Do not wring or twist.
- Roll in a clean towel to remove excess water.
- Lay flat to dry, reshaping as needed.
- Avoid direct sunlight or high heat, which can damage the yarn and satin ribbon.
- Do not iron or bleach.
Baby Winter Bonnet & Booties Set Free Size Guide
I hope you enjoyed creating this special baby winter crochet set! There’s nothing quite like the joy of crafting something beautiful and functional for the little ones in your life. Your handmade newborn crochet pattern creation is truly unique.
Don’t forget to share your finished bonnet and booties on social media! Tag me with #BabyBonnetBootiesSet and #MySweetCreations. I’d love to see your beautiful work! Save this pattern to your Pinterest board so you can easily find it again, and leave a comment below to let me know how your project turned out. Happy crocheting!