
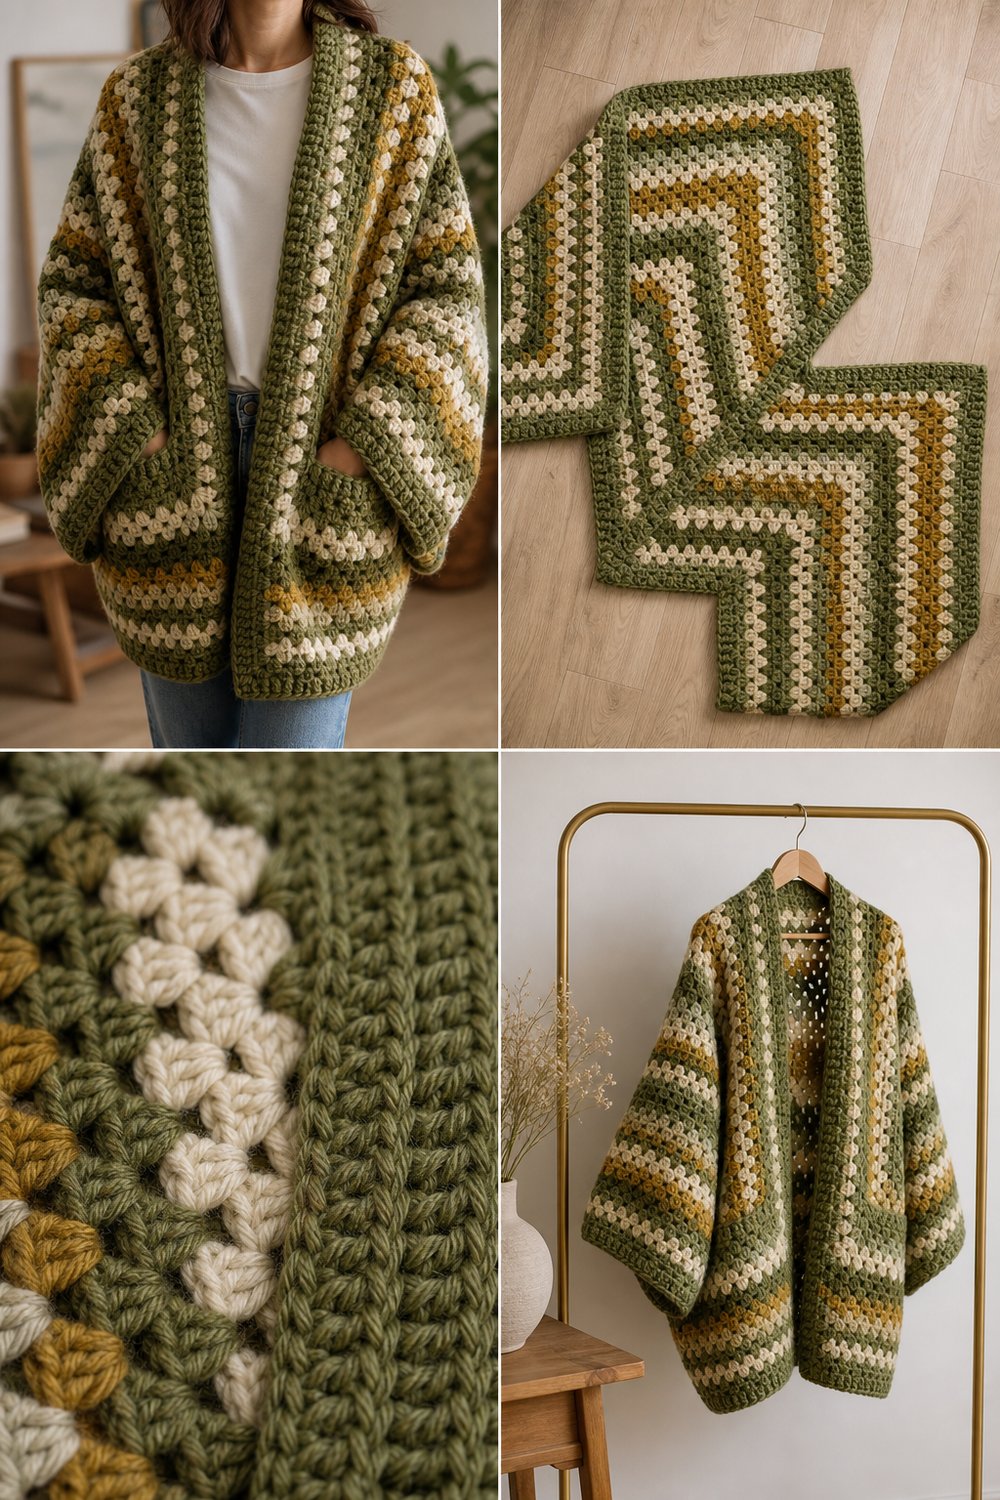
Wrap yourself in the comforting embrace of rich textured yarn fibers and effortless style with a garment designed for slow, mindful crafting and maximum everyday wearability. Whether you are throwing it on over a linen tee for a brisk morning coffee run or styling it on a minimalist brass rack, this piece brings artisanal charm directly into your handmade wardrobe.
Oversized Granny Hexagon Cardigan Top Free Hexagon Top Pattern
Quick Facts
- Stitches Used: Chain (ch), Slip Stitch (sl st), Double Crochet (dc), Front Post Double Crochet (fpdc), Back Post Double Crochet (bpdc)
- Size Fit: Oversized Cocoon Fit (Designed with 10–14 inches of positive ease across the bust)
- Estimated Hours to Complete: 15–20 hours of relaxed crafting
- Gift-Appeal Framing: A breathtaking, heirloom-quality garment that looks like a high-end boutique piece—making it the ultimate statement gift for a cherished friend or an indulgent project for yourself.
Full sizing customization tips are included later in this post so you can tailor the exact drape to your frame.
What Makes This Oversized Granny Hexagon Cardigan Top Free Hexagon Top Pattern Special
This garment is constructed using the ingenious two-hexagon method, where two giant flat hexagons are cleverly folded and seamed down the back and top sleeves to form a seamless, cocoon-style cardigan. The classic 3-dc cluster granny stitch creates an airy, draping fabric that showcases the rich color transitions of moss green, olive, cream, and mustard without feeling heavy. To anchor the oversized, slouchy drape, the design features a thick, structured ribbed border worked in alternating post stitches, offering a stunning professional finish that elevates the rustic granny motif into modern high fashion.
Skill Level
- Intermediate
- Comfortable working in the round
- Familiar with basic granny cluster construction
- Basic understanding of garment seaming and post-stitch ribbing
💡 Designer Tip: If you have mastered a traditional granny square, you already possess all the core skills needed for this cardigan! Take your time with the final joining and seaming phase, as clean lines here ensure a professional drape.
Finished Measurements
| Size Range | To Fit Bust (Inches) | To Fit Bust (Cm) | Finished Width / Wingspan (Inches) | Finished Width / Wingspan (Cm) | Total Length (Inches) | Total Length (Cm) |
|---|---|---|---|---|---|---|
| S/M (One Size Regular) | 32–38 in | 81–96 cm | 52 in | 132 cm | 26 in | 66 cm |
| L/XL (Oversized Relaxed) | 40–48 in | 101–122 cm | 60 in | 152 cm | 29 in | 74 cm |
| 2X/3X (Generous Drape) | 50–58 in | 127–147 cm | 68 in | 173 cm | 32 in | 81 cm |
Materials You Will Need
- Yarn: Worsted weight (Category 4) wool or wool-blend yarn
- Hook: 5.5 mm (US I-9) crochet hook (or size needed to obtain gauge)
- Notions: Tapestry needle for weaving ends, locking stitch markers, measuring tape, sharp scissors
| Colorway Code | Color Name | Yarn Weight / Type | Yardage Needed (S/M) | Yardage Needed (L/XL) | Yardage Needed (2X/3X) |
|---|---|---|---|---|---|
| A | Moss Green | Worsted Weight (4) | 350 yds | 420 yds | 500 yds |
| B | Olive | Worsted Weight (4) | 300 yds | 360 yds | 430 yds |
| C | Cream | Worsted Weight (4) | 450 yds | 540 yds | 640 yds |
| D | Mustard | Worsted Weight (4) | 250 yds | 300 yds | 360 yds |
Yarn Suggestions
| Yarn Brand & Line | Weight | Yardage per Skein | Notes |
|---|---|---|---|
| Lion Brand Wool-Ease | Worsted (4) | 197 yds / 180 m | Excellent stitch definition, washable, great color range |
| Caron Simply Soft | Worsted (4) | 315 yds / 288 m | Beautiful sheen and wonderful drape for cardigans |
| Paintbox Yarns Simply Aran | Aran (4) | 201 yds / 184 m | Budget-friendly option with rich, matte earthy tones |
⚠️ Note: Avoid heavy 100% cotton yarns for this specific pattern, as the weight can cause the giant hexagon panels to stretch excessively and distort the cocoon silhouette over time.
Gauge
| Measurement Type | Stitch / Row Count | Finished Dimension |
|---|---|---|
| Granny Cluster Gauge | 3 granny clusters and 3 rows | 4 x 4 inches (10 x 10 cm) |
| Ribbing Gauge | 14 sts and 12 rows of fpdc/bpdc | 4 x 4 inches (10 x 10 cm) |
⚠️ Note: Always work a gauge swatch in the round using your granny stitch pattern before starting your panels to ensure your finished cardigan fits the targeted dimensions.
Abbreviations
| Abbreviation | Full Term |
|---|---|
| ch | Chain |
| sl st | Slip Stitch |
| sc | Single Crochet |
| dc | Double Crochet |
| sp(s) | Space(s) |
| st(s) | Stitch(es) |
| dc-cluster | 3 double crochets worked into the same space |
| fpdc | Front Post Double Crochet |
| bpdc | Back Post Double Crochet |
| rnd(s) | Round(s) |
| rep | Repeat |
Special Stitches Explained
- Double Crochet Cluster (dc-cluster): Work 3 double crochets into the indicated space or stitch. Unless specified otherwise, do not chain between clusters within the same side of a hexagon.
- Hexagon Corner: Worked as (dc-cluster, ch 2, dc-cluster) in the designated ch-2 corner space. This creates the sharp 120-degree angles required to transform a square-like start into a flat six-sided motif.
- Front/Back Post Double Crochet (fpdc/bpdc): Yarn over, insert hook from front to back (or back to front for bpdc) around the post of the indicated stitch from the row below, yarn over, pull up a loop, complete as a standard double crochet. Used to create textured ribbing.
Pattern Instructions
Section 1: The Two Hexagon Panels (Make 2)
Using Color A, start with a magic ring (or ch 4 and sl st to form a ring).
Rnd 1: Ch 3 (counts as first dc here and throughout), work 2 dc into the ring, ch 2, (dc-cluster, ch 2) 5 times into the ring. Join with a sl st to the top of the starting ch-3. Fasten off Color A. (6 dc-clusters, 6 ch-2 sps)
Rnd 2: Join Color B in any ch-2 corner space. Ch 3, (2 dc, ch 2, 3 dc) in same ch-2 sp (first corner made). Skip next 3 sts, work (3 dc, ch 2, 3 dc) in next ch-2 sp (corner made); rep from * 4 more times, skipping the final 3 sts. Join with a sl st to top of starting ch-3. Fasten off Color B. (12 dc-clusters, 6 ch-2 sps)*
Rnd 3: Join Color C in any ch-2 corner space. Ch 3, (2 dc, ch 2, 3 dc) in same ch-2 sp. (Skip next cluster group, work dc-cluster in the space between cluster groups; work [3 dc, ch 2, 3 dc] in next ch-2 corner sp); rep from * 4 more times, working final side space and joining with sl st to top of starting ch-3. Fasten off Color C. (18 dc-clusters, 6 ch-2 sps)*
Rnd 4: Join Color D in any ch-2 corner space. Ch 3, work corner (2 dc, ch 2, 3 dc) in same sp. Work one dc-cluster in each space between clusters along the side to the next corner, working (3 dc, ch 2, 3 dc) in each ch-2 corner sp; rep from * around. Join with sl st to top of starting ch-3. Fasten off Color D. (24 dc-clusters, 6 ch-2 sps)*
Rnds 5–13: Continue working in established color sequence (Color A, Color B, Color C, Color D), increasing by one cluster per side per round. Each corner receives (3 dc, ch 2, 3 dc), and each side space receives one dc-cluster.
– Rnd 5 (Color A): (30 dc-clusters, 6 ch-2 sps)
– Rnd 6 (Color B): (36 dc-clusters, 6 ch-2 sps)
– Rnd 7 (Color C): (42 dc-clusters, 6 ch-2 sps)
– Rnd 8 (Color D): (48 dc-clusters, 6 ch-2 sps)
– Rnd 9 (Color A): (54 dc-clusters, 6 ch-2 sps)
– Rnd 10 (Color B): (60 dc-clusters, 6 ch-2 sps)
– Rnd 11 (Color C): (66 dc-clusters, 6 ch-2 sps)
– Rnd 12 (Color D): (72 dc-clusters, 6 ch-2 sps)
– Rnd 13 (Color A): (78 dc-clusters, 6 ch-2 sps)
✅ Checkpoint: At the completion of Round 13, lay your hexagon flat. Measure from one flat side across to the opposite flat side. It should measure approximately 26 inches (66 cm) across for the S/M size. (Note: For L/XL and 2X/3X sizes, continue working for 14 or 15 rounds respectively).
Fasten off and weave in all tails before proceeding to assembly. Make a second identical hexagon panel.
Section 2: Folding and Seaming the Hexagon Panels
Take one hexagon panel and lay it flat on a clean surface. Fold the hexagon in half by bringing two opposite parallel edges together, transforming the flat six-sided shape into an L-shaped cocoon half.
Repeat this exact folding process with your second hexagon panel so you have two matching L-shaped pieces.
Position the two folded L-shapes side-by-side so their back straight edges meet along the center spine. Using a tapestry needle and a length of Color C, whipstitch or mattress stitch the two back edges together from the bottom hem up to the back neck nape.
Next, seam the top edges of the sleeves together from the outer wrist inward, leaving an armhole opening of approximately 7 to 9 inches (adjust based on your preferred arm comfort).
✅ Checkpoint: Turn your joined cardigan right-side out. Verify that the back seam lies flat and that both sleeve seams are secure and symmetrical.
Section 3: Adding the Bottom, Front, and Collar Ribbing
Join Color A at the bottom center-back hem edge to begin working the continuous ribbed border.
Rnd 1: Ch 2 (does not count as st), work evenly spaced single crochet stitches all along the bottom hem, up the right front opening, around the back neck collar, and down the left front opening, ending with a sl st to the first sc. (Stitch count will vary by size; ensure your sc count is a multiple of 2 for ribbing)
Rnd 2: Ch 2, work (fpdc around first st, bpdc around next st) around the entire perimeter of the cardigan opening, working a dc decrease in the sharp front corners if necessary to keep the collar lying flat. Join with a sl st to first fpdc. (Total ribbing sts matching Rnd 1)
Rnds 3–5: Rep Rnd 2 for 3 more rounds of alternating post stitches to build a thick, luxurious ribbed border. Fasten off securely.
Section 4: Cuffs
Join Color A at the seam of one sleeve opening.
Rnd 1: Ch 2, work evenly spaced single crochet stitches around the entire cuff opening, joining with a sl st. (36 sc)
Rnds 2–4: Ch 2, work (fpdc, bpdc) around the entire cuff. Join with a sl st to first fpdc. Fasten off. Repeat for the second sleeve cuff. (36 sts)
Weave in all remaining yarn ends securely using your tapestry needle.
Size Customization Tips
- To Size Up: Simply continue working additional rounds on your hexagon panels (e.g., Rnds 14 and 15) before folding and seaming. Each additional round adds approximately 2 inches of overall wingspan and width to the finished cardigan.
- To Size Down: Stop working your hexagon panels 1 or 2 rounds earlier (e.g., ending at Rnd 11 or 12). Ensure both panels match in total round count before seaming.
- Length Adjustment: To make the cardigan longer in the body without widening the sleeves excessively, you can work extra rows of single crochet along the bottom hem before beginning your post-stitch ribbing, or add extra rows of ribbing.
Care Instructions
- Hand wash gently in cool water using a mild wool wash, or machine wash on a delicate wool cycle inside a mesh laundry bag.
- Do not bleach or wring out the garment.
- Lay flat to dry on a clean towel, reshaping gently to match your finished measurements.
- Do not iron; steam lightly if necessary to relax the granny clusters.
Oversized Granny Hexagon Cardigan Top Free Hexagon Top Pattern
Thank you so much for crafting along with me today! I hope you adore wearing your brand-new handmade cocoon cardigan as much as I loved designing it for you.
If you share your finished project on Instagram or Pinterest, please tag me and use the hashtag #GrannyHexagonCardiganTop so I can admire your gorgeous color combinations and celebrate your beautiful stitches. Save this project to your Pinterest boards for later, and leave a comment below to let me know which colorway you chose! Happy crocheting!