
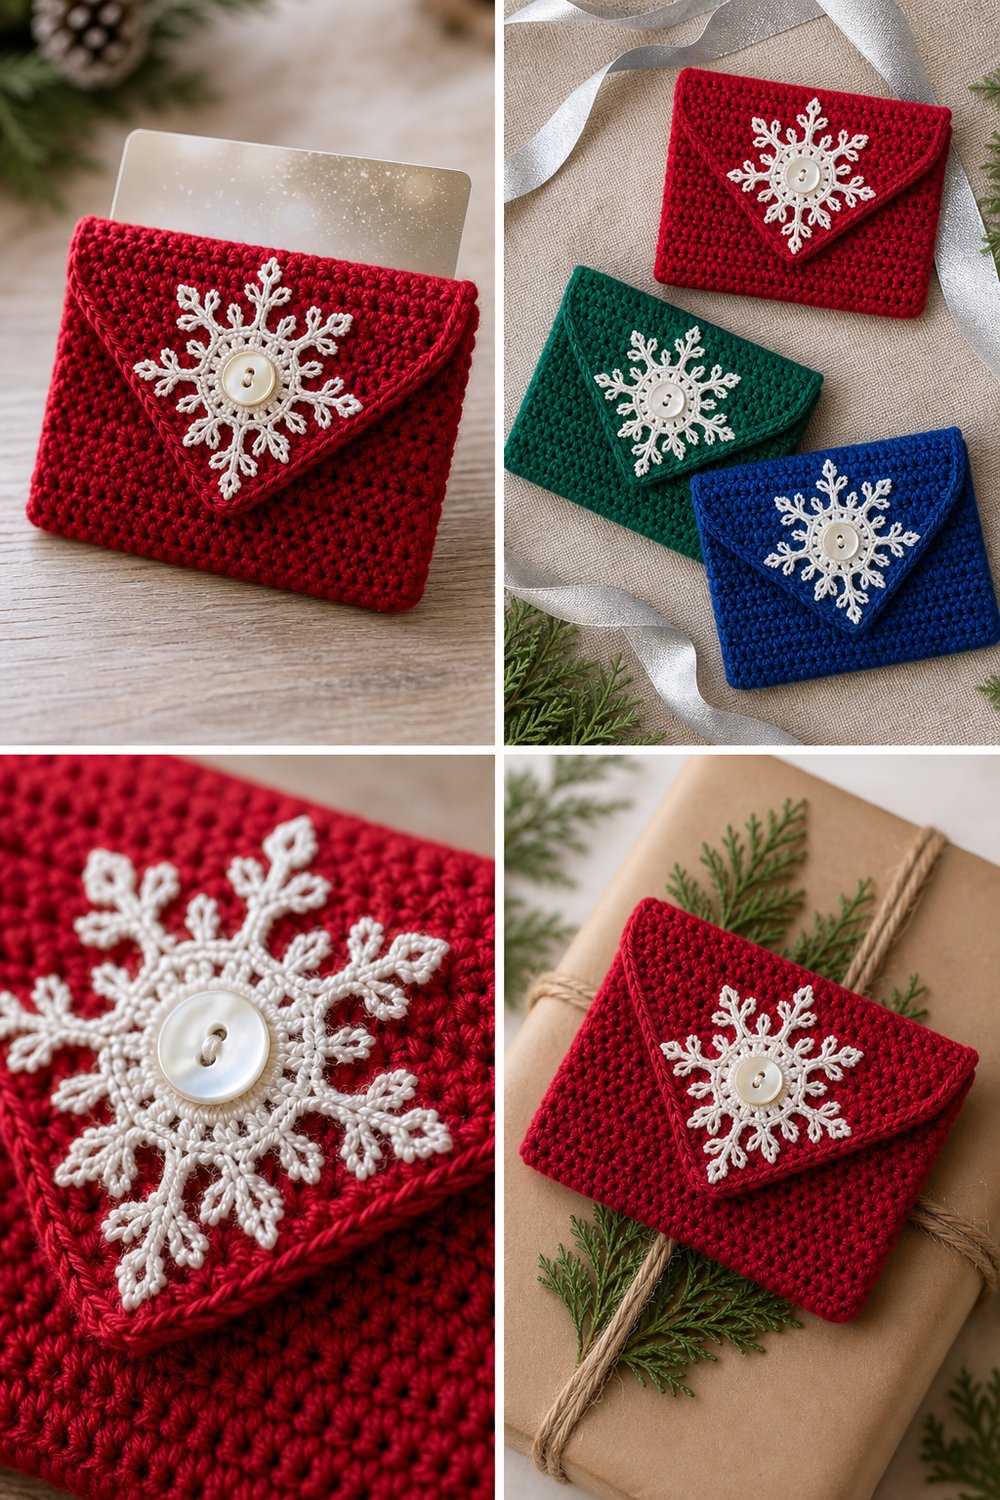
Elevate your holiday gift-giving this season with a handmade touch that feels truly magical. Opening a crisp natural linen parcel to reveal a crimson pouch adorned with delicate white lace instantly brings the warmth of a traditional winter celebration right to your fingertips.
Festive Snowflake Gift Card Holder Pouch Free Crochet Guide
Quick Facts
- Stitches Used: Chain (ch), Single Crochet (sc), Half Double Crochet (hdc), Slip Stitch (sl st), Treble Crochet (tr)
- Size Fit: Standard standard gift card / credit card size (fits cards measuring 3.375″ x 2.125″ / 8.6cm x 5.4cm)
- Estimated Hours to Complete: 1.5 to 2 hours per pouch
- Gift-Appeal Framing: Ideal for quick-to-stitch holiday market inventory, teacher appreciation tokens, stocking stuffers, and elegant corporate gift presentations.
Sizing customization tips are included later in this guide to help you adapt the pouch for custom dimensions.
What Makes This Festive Snowflake Gift Card Holder Pouch Special
This charming design marries structural durability with fine, heirloom-quality details. The pouch base is worked in firm, dense single crochet using a smaller-than-recommended hook, creating a sturdy fabric that protects gift cards and prevents edges from bowing or stretching out. The front flap incorporates an integrated geometric envelope fold, secured seamlessly by a tiny mother-of-pearl button closure. Topped with a multi-pointed crochet snowflake motif worked in fine mercerized cotton, the piece achieves a crisp, frosted lace effect without losing its functional integrity.
Skill Level
- Difficulty: Intermediate
- Required Skills:
- Working in rows and working in the round/loops of foundations
- Basic increases and decreases (sc2tog)
- Working intricate thread-weight motifs (the snowflake)
- Surface slip stitching and clean buttonhole creation
- Basic sewing to attach buttons and appliques securely
💡 Designer Tip: Don’t let the lace snowflake intimidate you! Take it one round at a time using your smaller steel hook, and block the finished motif lightly with steam before sewing it onto the flap.
Finished Measurements
| Measurement Type | Imperial (Inches) | Metric (Centimeters) |
|---|---|---|
| Pouch Width | 4.0 inches | 10.2 cm |
| Pouch Height (Closed) | 2.75 inches | 7.0 cm |
| Flap Depth | 1.5 inches | 3.8 cm |
| Snowflake Applique Diameter | 2.25 inches | 5.7 cm |
Materials You Will Need
- Yarn Weight: Sport weight (Pouch body) and Size 10 Crochet Thread (Snowflake applique)
- Hook Sizes: US D/3 (3.25mm) for pouch body; US Steel 6 (1.75mm) for snowflake motif
- Notions: Tapestry needle, scissors, 1 tiny mother-of-pearl button (8mm), matching sewing thread and needle for button attachment
| Colorway Sequence | Yarn Type & Weight | Exact Yardage Needed |
|---|---|---|
| Crimson Red | 100% Cotton Sport Weight | 35 yds / 32 m |
| White | Size 10 Cotton Crochet Thread | 15 yds / 14 m |
| Emerald Green | 100% Cotton Sport Weight | 35 yds / 32 m |
| Royal Blue | 100% Cotton Sport Weight | 35 yds / 32 m |
Yarn Suggestions
| Yarn Brand & Line Name | Fiber Content & Weight | Skein Yardage | Notes |
|---|---|---|---|
| Schachenmayr Catania | 100% Mercerized Cotton (Sport) | 137 yds / 125 m per 50g | Exceptional stitch definition and rich holiday color options. |
| Lion Brand Coboo | 50% Cotton, 50% Bamboo (Sport) | 232 yds / 212 m per 100g | Provides a soft sheen and wonderful drape for pouches. |
| Aunt Lydia’s Classic Crochet Thread | 100% Mercerized Cotton (Size 10) | 350 yds / 320 m per ball | The gold standard for crisp, structural snowflakes. |
⚠️ Note: Avoid stretchy acrylic or fuzzy novelty yarns for this project. They obscure stitch definition and will cause the gift card pouch to warp and lose its structured shape.
Gauge
| Gauge Type | Stitches / Rows | Measurement |
|---|---|---|
| Pouch Body (sc) | 22 sc x 24 rows | 4 x 4 inches (10 x 10 cm) |
| Snowflake Motif | Diameter across widest points | 2.25 inches (5.7 cm) |
💡 Designer Tip: Always check your gauge before starting the main body. If your stitches are too loose, the gift card may slip out; if they are too tight, inserting the card will be a struggle.
Abbreviations
| Abbreviation | Full Term |
|---|---|
| ch | Chain |
| sl st | Slip Stitch |
| sc | Single Crochet |
| hdc | Half Double Crochet |
| dc | Double Crochet |
| tr | Treble Crochet |
| st(s) | Stitch(es) |
| rep | Repeat |
| RS | Right Side |
| WS | Wrong Side |
| sc2tog | Single Crochet 2 Stitches Together (Decrease) |
| sp(s) | Space(s) |
Special Stitches Explained
- Picot: Ch 3, insert hook into the back bump and front loop of the first chain made, yarn over, pull through loop and through loop on hook.
- Cluster (Cl): [Yarn over, insert hook into specified st/sp, yarn over, pull up loop, yarn over, pull through 2 loops] 3 times in the same st/sp, yarn over, pull through all 4 loops on hook.
Pattern Instructions
Section 1: Main Pouch Body (Crimson, Emerald, or Royal Blue)
Using US D/3 (3.25mm) hook and chosen pouch color:
– Row 1: Ch 23, working in back bumps of chain, sc in 2nd ch from hook and in each ch across, turn. (22 sc)
– Rows 2–28: Ch 1 (does not count as st here and throughout), sc in each st across, turn. (22 sc)
– Row 29 (Buttonloop Edge): Ch 1, sc in first 10 sts, ch 5, skip next 2 sts (creates buttonloop), sc in remaining 10 sts, turn. (20 sc, 1 ch-5 sp)
– Row 30: Ch 1, sc in each st and 5 sc evenly across the ch-5 sp, sc in remaining sts, fasten off leaving a 12-inch tail for seaming. (25 sc)
✅ Checkpoint: Measure your flat rectangular piece at this stage. It should measure approximately 4 inches wide by 5.5 inches tall before folding.
Section 2: Pouch Assembly & Flap
- Lay the rectangular piece flat with the WS facing up and the buttonloop edge at the top.
- Fold the bottom edge upward by 2.25 inches to form the pocket pocket. Align the side edges neatly.
- Using your yarn tail and tapestry needle, whipstitch up the left and right side seams securely. Fasten off and weave in ends.
- Fold the top flap (containing the ch-5 button loop) down over the front of the pouch. Mark the placement point for the mother-of-pearl button on the front pocket face directly beneath the loop.
- Sew the mother-of-pearl button securely onto the marked spot using matching sewing thread.
Section 3: Snowflake Lace Applique (White Thread)
Using US Steel 6 (1.75mm) hook and white size 10 thread:
– Round 1: Make a magic ring, ch 1, work 12 sc into the ring, join with sl st to first sc, pull ring closed. (12 sc)
– Round 2: Ch 4 (counts as 1 dc + ch 1), [dc in next sc, ch 1] 11 times, join with sl st to 3rd ch of starting ch-4. (12 dc, 12 ch-1 sps)
– Round 3: Sl st into the first ch-1 sp, ch 1, (sc, hdc, dc, picot, dc, hdc, sc) in same ch-1 sp, sc in next ch-1 sp; rep from * around, joining with sl st to first sc. (6 snowflake points)
– Fasten off, leaving a 10-inch tail for attaching. Lightly block the snowflake with steam so points lie flat.
– Center the snowflake applique onto the front flap of the pouch and sew securely in place through the inner loops of Round 2.
Size Customization Tips
- To fit wider or taller cards: Chain an initial multiple of stitches plus 1 for turning to adjust the width, and add rows prior to the buttonloop row to adjust pocket height. Each additional 2 rows adds roughly 0.25 inches (0.6 cm) of height.
- To adjust flap depth: Work fewer or more repeat rows before initiating the buttonloop edge in Section 1.
Care Instructions
- Hand wash gently in cool water with mild wool wash.
- Do not wring or twist the pouch.
- Lay flat to dry on a clean towel, reshaping the square corners and pinning out the white lace snowflake points for crisp definition.
- Cool iron on reverse side if needed, avoiding direct heat on the mother-of-pearl button.
Festive Snowflake Gift Card Holder Pouch Free Crochet Guide
Thank you so much for stitching along with me today! I hope creating these little heirloom pouches brings immense joy to your holiday preparation.
If you make your own Festive Snowflake Gift Card Holder Pouch, please share photos of your gorgeous colorways on social media! Tag me and use the hashtag #FestiveSnowflakePouch so I can admire your beautiful holiday makes. Be sure to save this guide to your favorite Holiday Crochet or Gift Ideas boards on Pinterest, and leave a comment below letting me know which colorway is your favorite!